This post is still being constructed, content/information will change!
Configuration Manager (MECM) Set Up
In this post, I will cover why I’m learning and building a full MECM install and setup. If you have ever been tasked with setting up Configuration Manager from scratch, you’re probably well aware of how much information is out there to help guide you through the process. The issue I ran into constantly was trying to decipher what information was accurate and relevant to my specific setup. There are numerous ways to build out MECM (and its other components) depending on your organization’s current environment, financial/resource limitations, goals, etc. At the City of Urbana, Illinois, I have been tasked with the project of creating a full MECM environment in preparation for migrating to Microsoft 365 . I decided to build and document a test version environment similar to what I’m dealing with at work in my home lab. This has allowed me to troubleshoot tons of issues throughout this setup process at home where I can at least bang my head against non-helpful error codes on my own time.
The Set Up
- Primary Server (Windows Server 2022 )
- Distribution Server (Windows Server 2022 )
- WSUS Server (Windows Server 2022 )
The Prerequisites
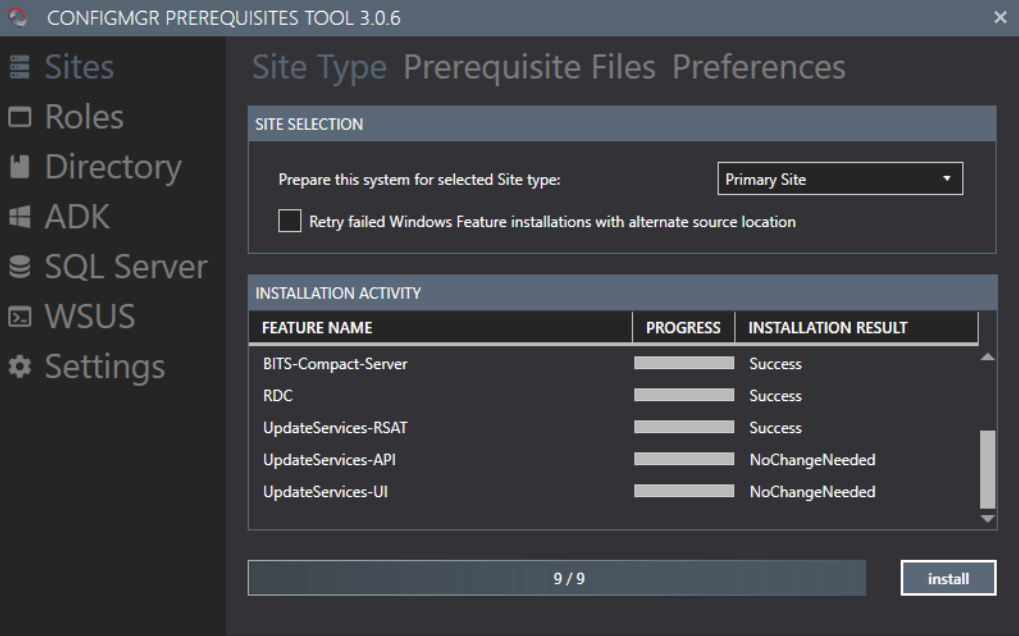
First download and install the Configuration Manager Prerequisites Tool on the Primary Server. This tool isn’t required, but I have found it extremely helpful for installing and setting up some of the basic drivers, settings, and addons that are needed for Configuration Manager. Within the Sites section of the application, click Site Type, select Primary Site, then click install. This may take some time, confirm in the Installation Activity section that all features have been successfully installed onto the Primary Server.
System Management
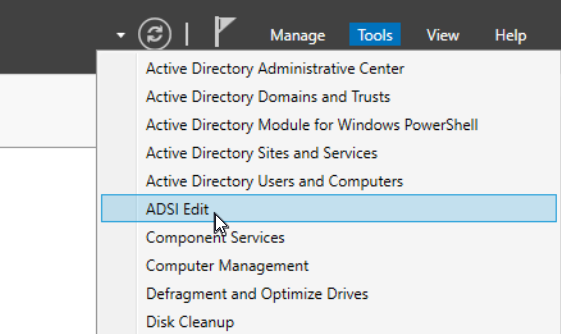
Next we need to create the System Management Container on the main domain controller. In the Server Manager on the domain controller, click the “Tools” dropdown towards the top right of the window and select ADSI Edit.
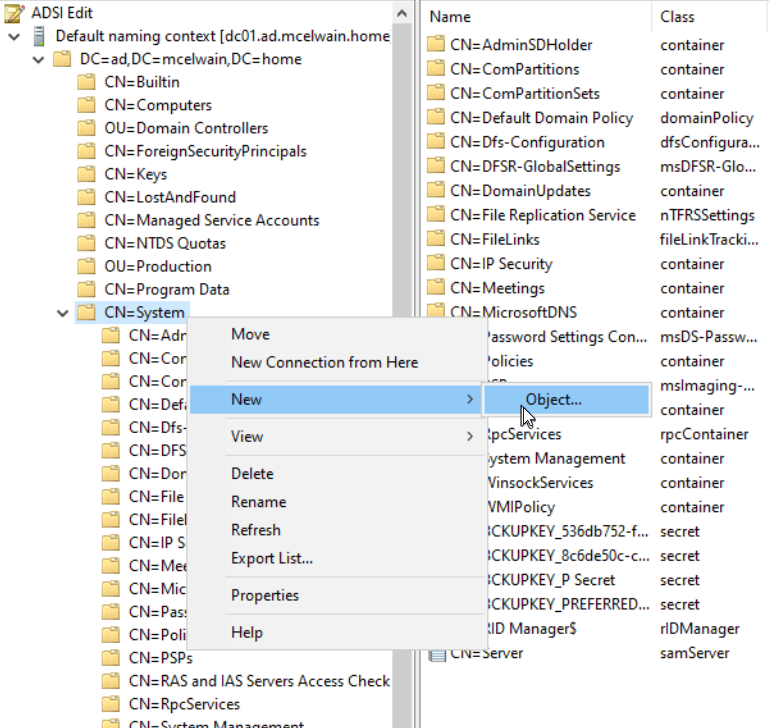
Right click ADSI Edit and select “Connect to…”, leave everything default and click OK. Open up “Default naming context” and CN=System. Right click CN=System, select New and then Object.
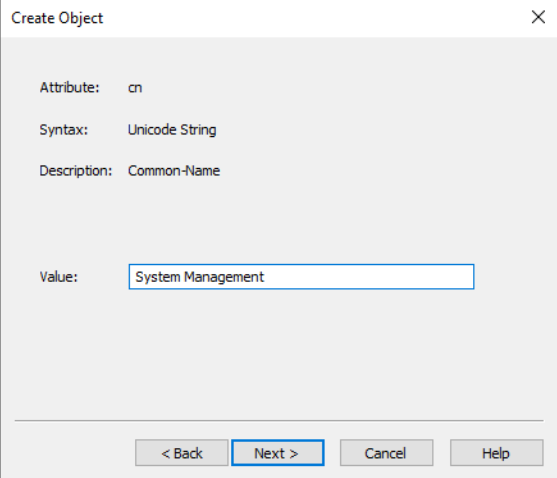
Select the “container” class and input System Management in the Value box.
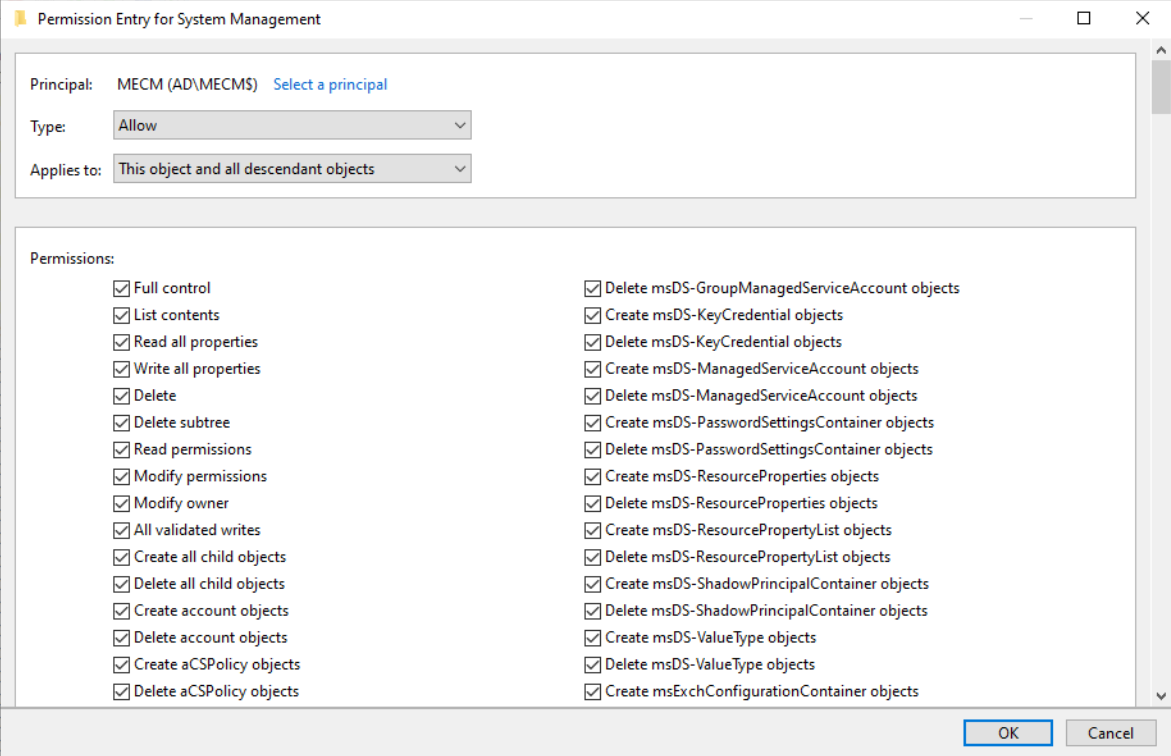
Right click the System Management folder, select properties, go into the Security tab, add the primary server computer account and Grant Full Control permissions.

Then, click “Advanced”, select the primary server computer account, then click Edit. In the Applies to list, select This object and all descendant objects.
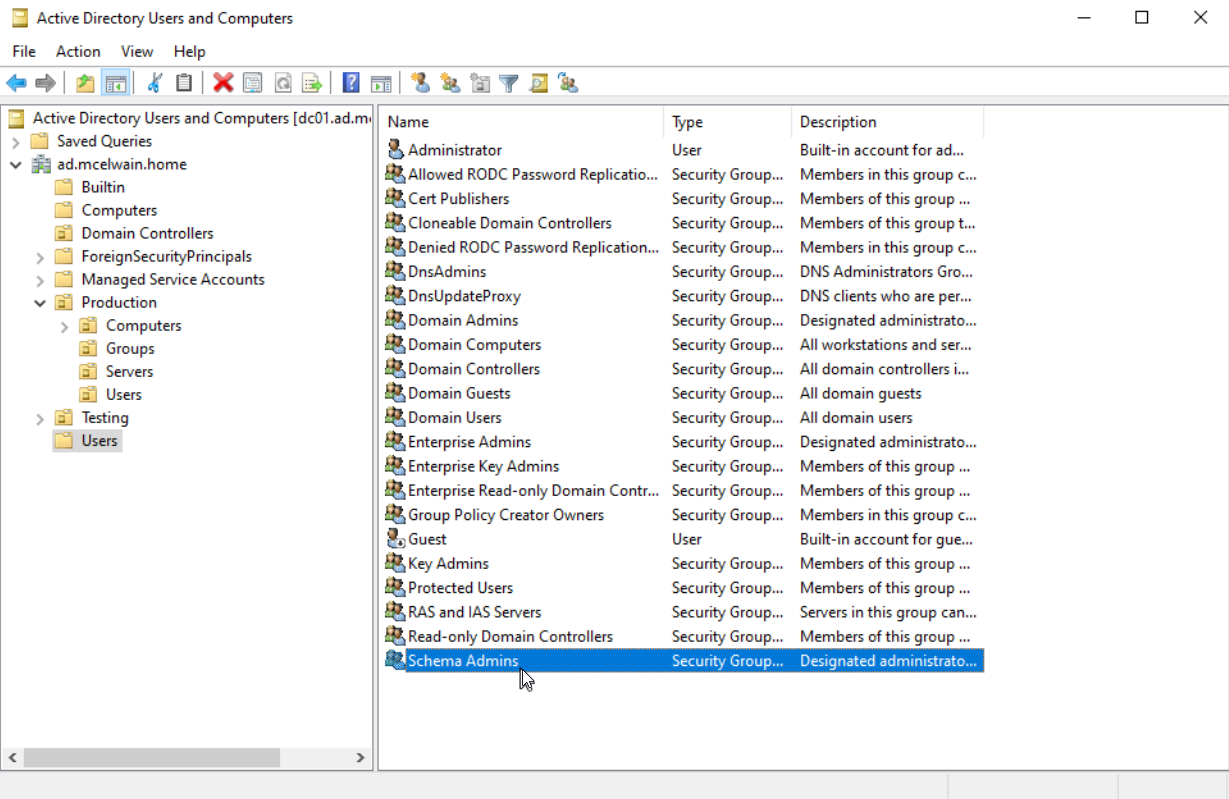
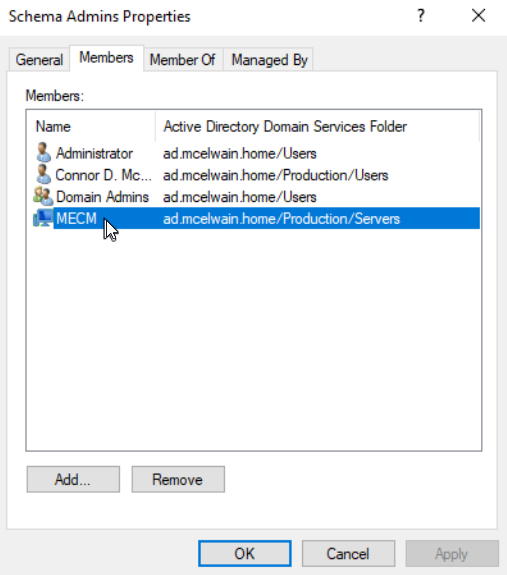
Click OK and close out of the ADSI Edit console. Make sure you add the computer account of the primary server that’s hosting MECM to the Schema Admins security group in Active Directory Users and Computers.
This step is NEEDED before proceeding below.
Updating Active Directory Schema
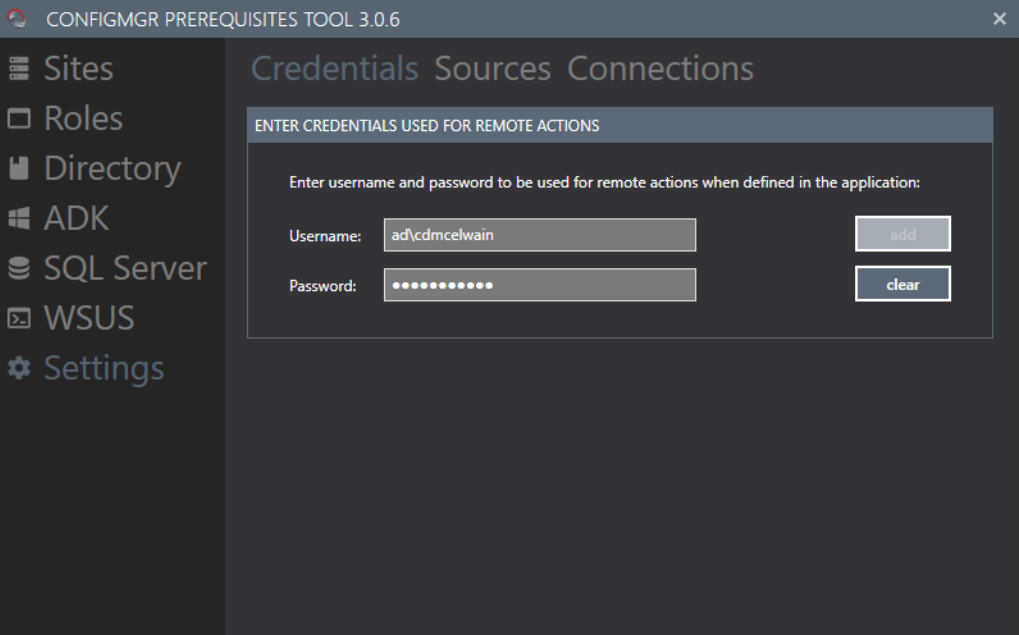
Go into the settings section of the Configuration Manager Prerequisites Tool on the Primary Server and add your domain admin account credentials. You can provide these credentials by navigating to the Settings section, then go to the Credentials tab.
This will be needed for the tool to properly update the Active Directory Schema . If you haven’t already, download Configuration Manager on the Primary Server. Now navigate back to the Configuration Manager Prerequisites Tool, select the Directory option, and within the Schema tab, click the detect button for the tool to identify your master domain controller.
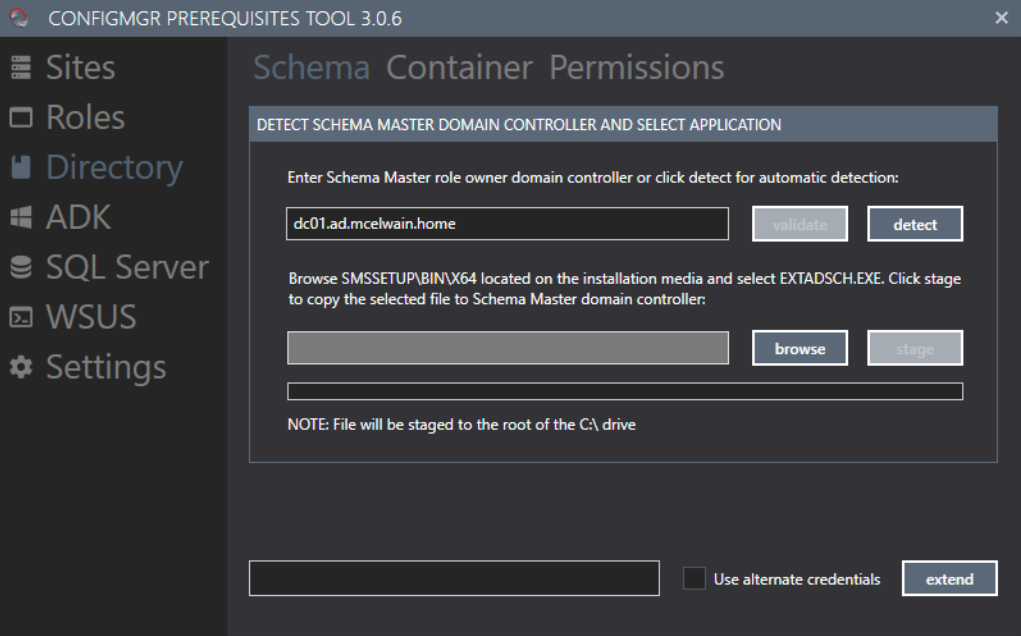
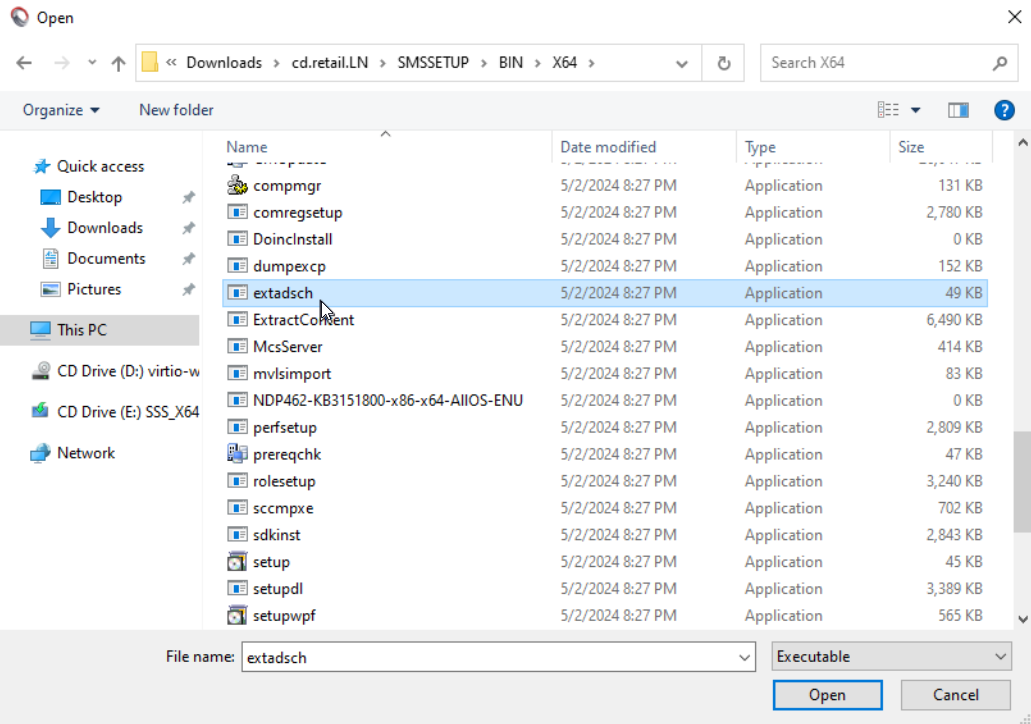
Click the browse button, within the Configuration Manager install folder we extracted earlier, find the file EXTADSCH.EXE within SMSSETUP\BIN\X64.
Click the extend button to proceed with extending the Active Directory schema for Configuration Manager.
Installing WSUS Server
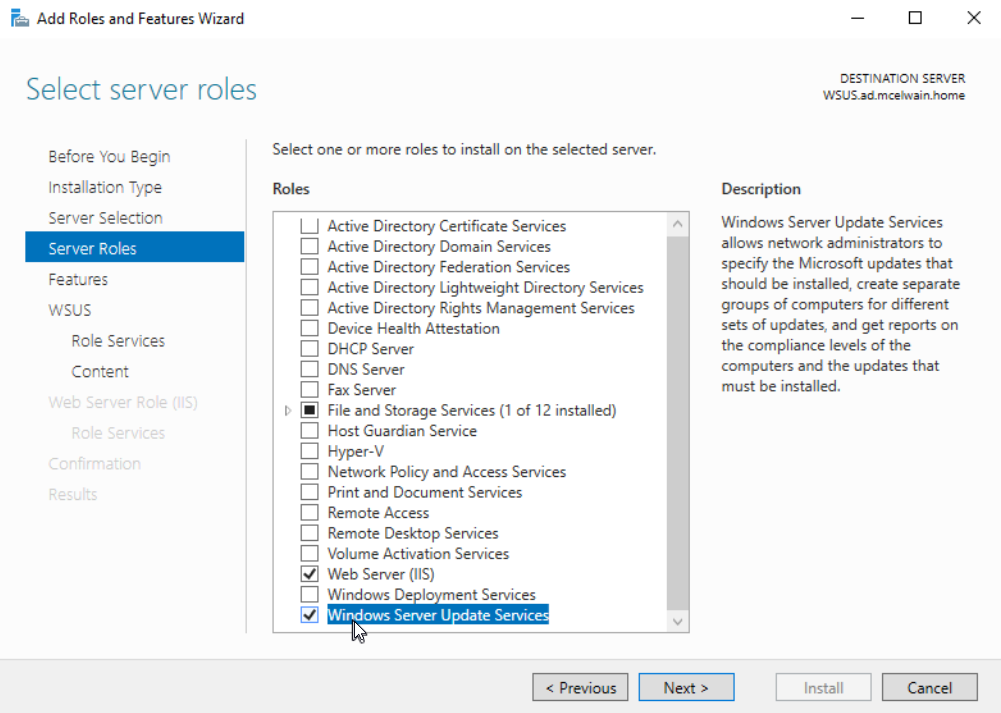
To install Windows Server Update Services (WSUS), navigate to the Manage tab towards the top right corner of Server Manager and select Add Roles and Features. The installation type will be Role-based or feature-based installation. On the Server Roles page, select the Windows Server Update Services check box and click next.
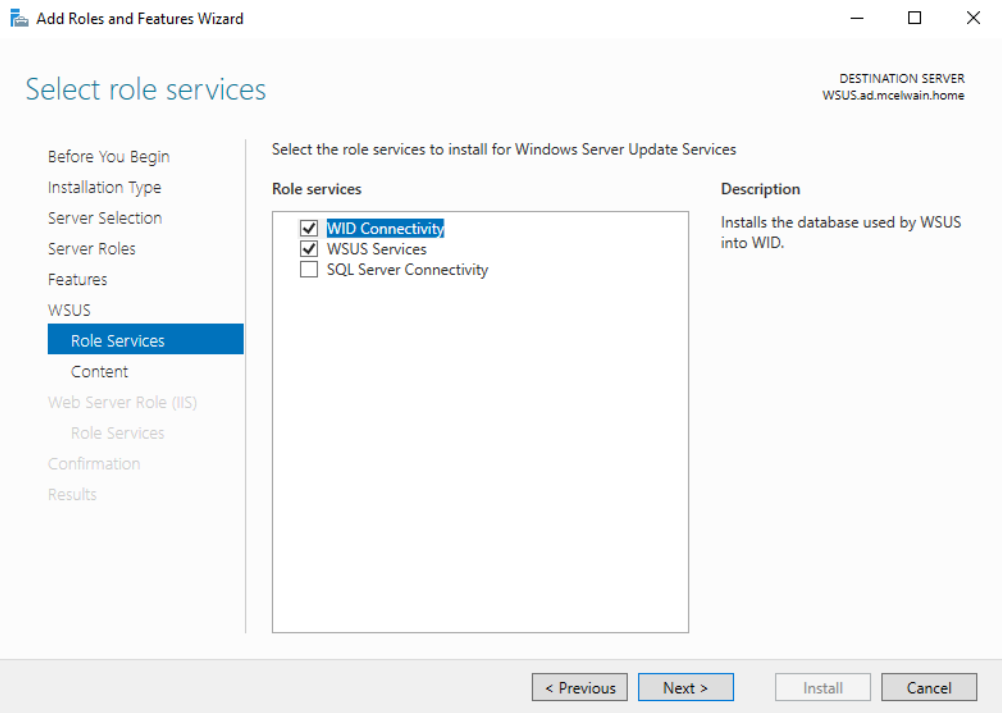
On the “Features” page, make sure you check .NET Framework 3.5 Features. This is REQUIRED for WSUS to install properly. In Role Services under WSUS, leave the defaults of WID Connectivity and WSUS Services checked and click next.
Before continuing, we need to create a folder (preferably on a separate drive from the OS) named WSUS. This is the location where WSUS will store updates locally. Check the box for Store updates in the following location, and provide the path for the folder you just created. Once WSUS is installed, you should get a notice in Server Manager wanting you to complete Post-Installation tasks, select it to start the post-installation configuration process. Once that has completed, you are done installing and configuring WSUS.
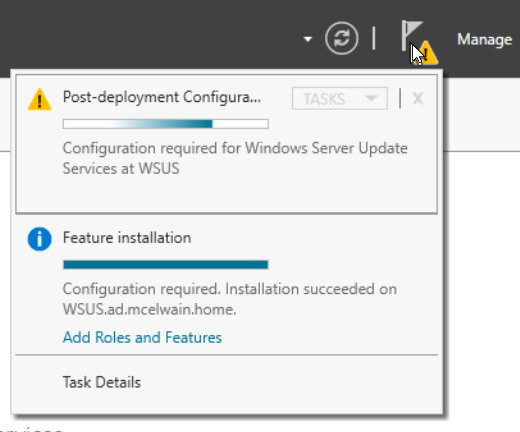
If you do open Windows Server Update Services, do NOT continue with the configuration process. This will be done after we have set up our Primary Server and installed/configured Configuration Manager.
Service Accounts & AD Groups
It’s best practice to create the necessary service accounts and groups before installation:
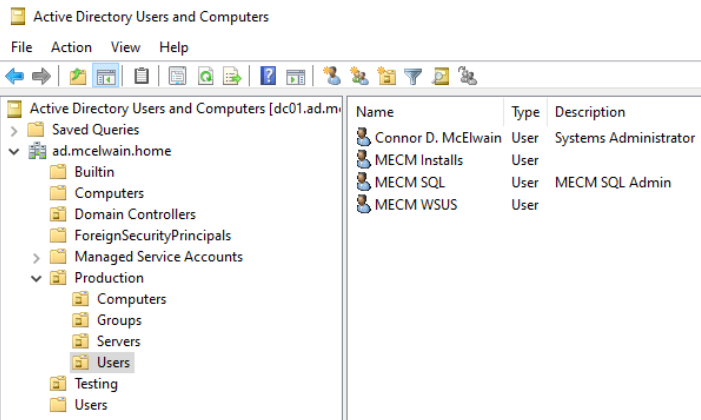
- Service Accounts
- SQL Server Service Account - MECM-SQL
- WSUS Service/Installation Account - MECM-WSUS
- MECM Software Install Service Account - MECM-Installs
- MECM Groups
- Domain group containing all MECM Admins - MECM-Admins
- Domain group containing all MECM servers in the hierarchy group - MECM-SiteServers
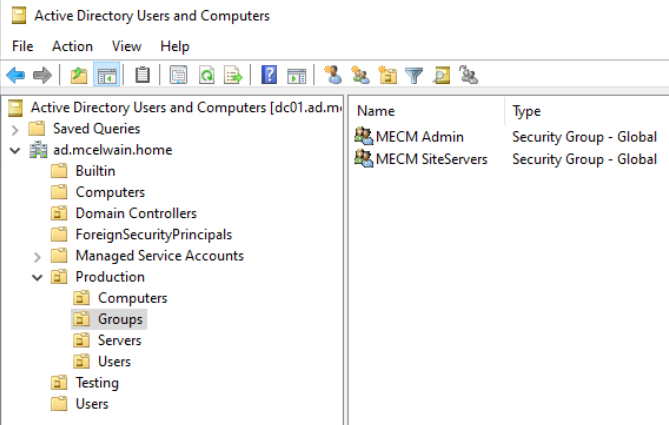
Provide these service accounts and groups in the proper administrative AD permission groups.
Primary Server Set Up
C:\ Drive File Prevention
Create a file named no_sms_on_drive.sms on the C: drive on all encompassing servers (Primary Site, Management/Distribution Point, WSUS Server).
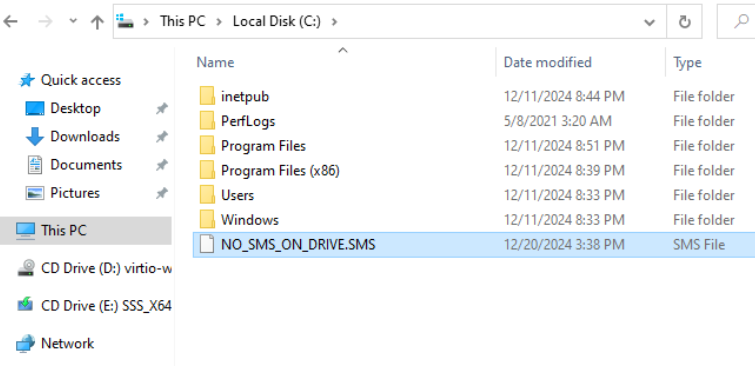
This file prevents Configuration Manager and other services from installing programs, files, and logs that should otherwise be on a separate non OS drive.
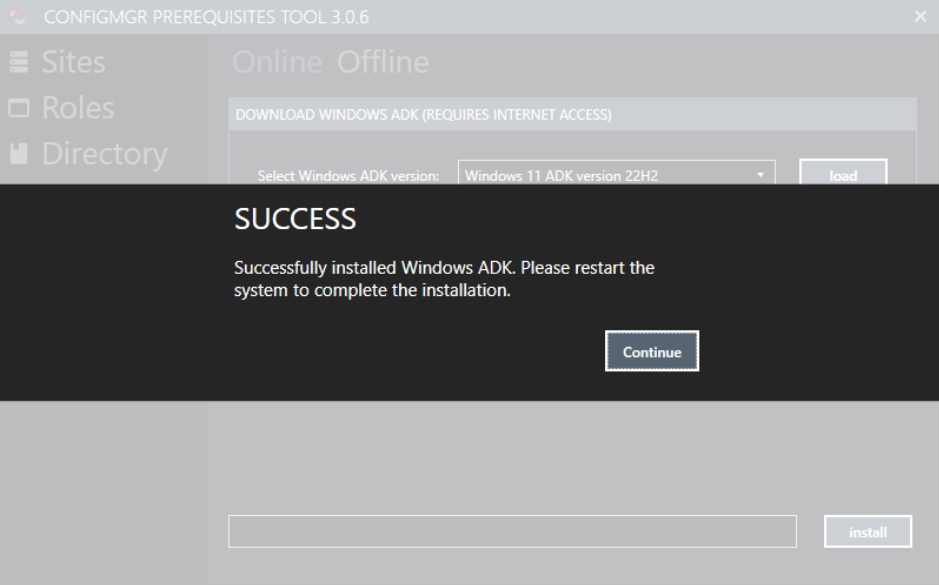
Windows ADK Type/Install
Within the Configuration Manager Prerequisites Tool, select the ADK section, within the “Online” tab, select the Windows ADK version you’d like installed. In my case, I’ll be installing the Windows 11 ADK version 22H2 and Windows PE add-on for the ADK for Windows 11 .
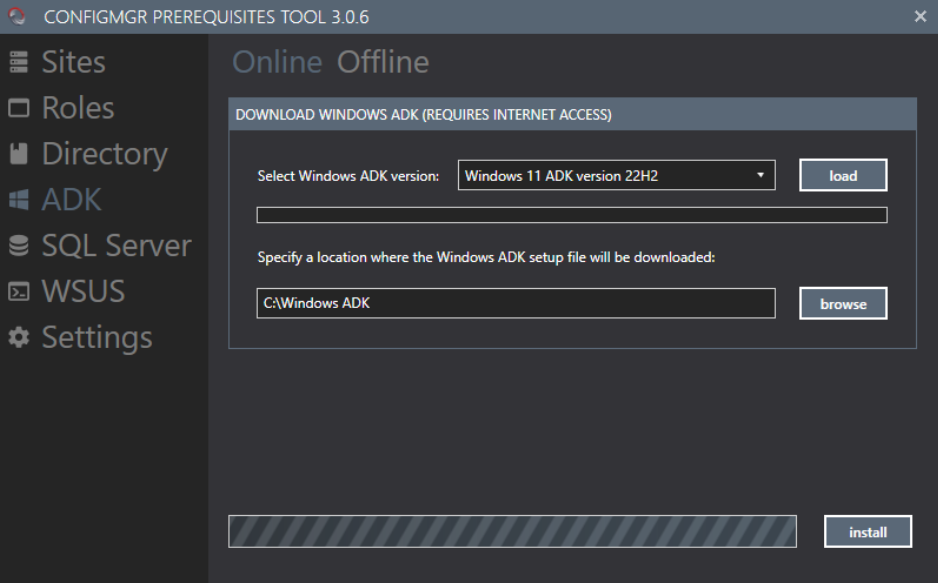
Create a folder to store the ADK install file, specify said location, and click install. Restart the system to complete the installation.
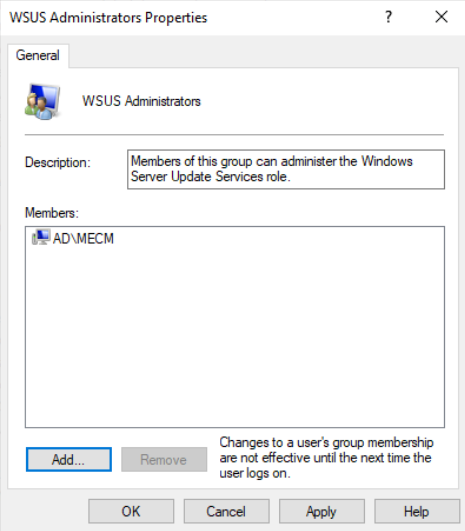
Local Administrative Access for Primary Server
Add your primary server (computer account) to the administrator group of your management/distribution point and WSUS server. You can access the Local Users and Groups by searching lusrmgr.msc in the Run function.
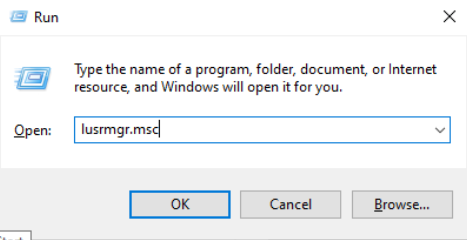
Specifically for the WSUS server, also add the primary server computer account to the WSUS Administrator group as well.
SQL Server Set Up
Next download your preferred compatible SQL Server. Due to what license we already had available, we went with the SQL Server 2019 Core Edition . Check the supported SQL server options if your environment requires newer/different SQL database needs. Launch SQL2019-SSEl-Eval and select Custom for the SQL installation process.
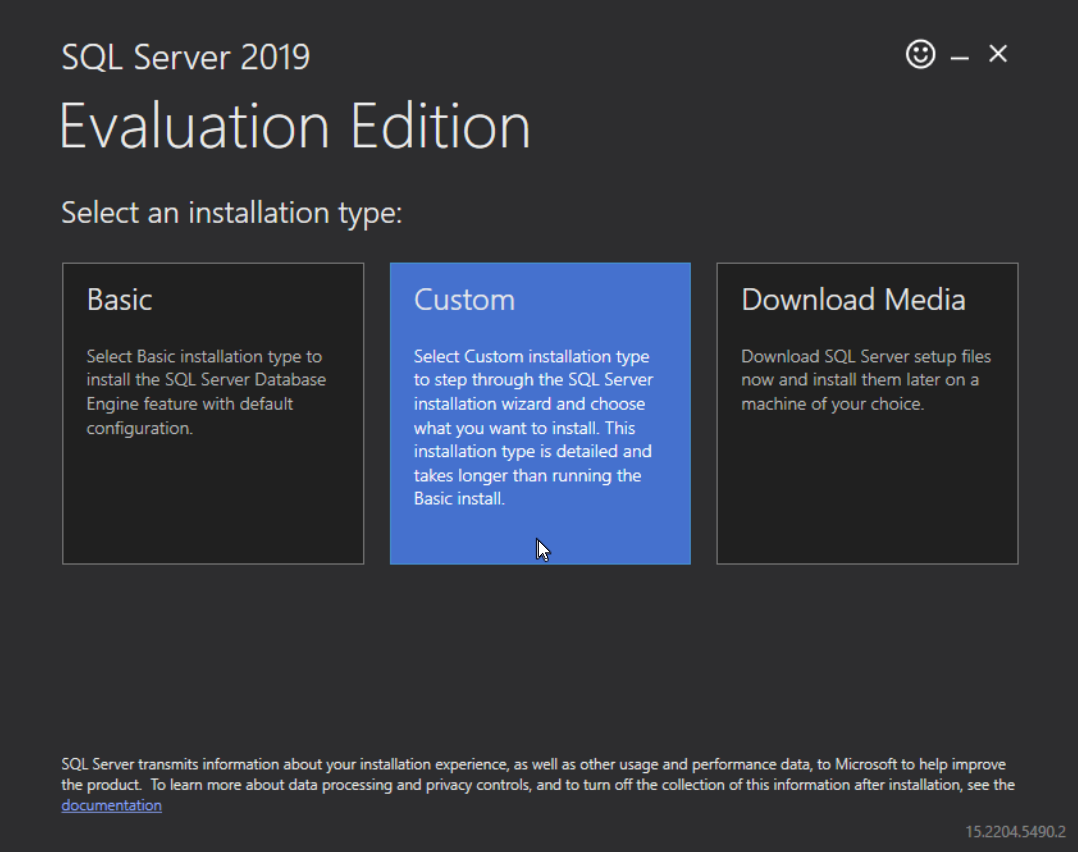
The SQL Server Installation Center should open, select the Installation tab towards the left side of the window, and select New SQL Server stand-alone installation or add features to an existing installation. Selecting what version of SQL Server you’re on is important, if you do not have a product key, select Evaluation under the “Specify a free edition:” drop down section.
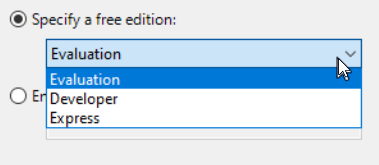
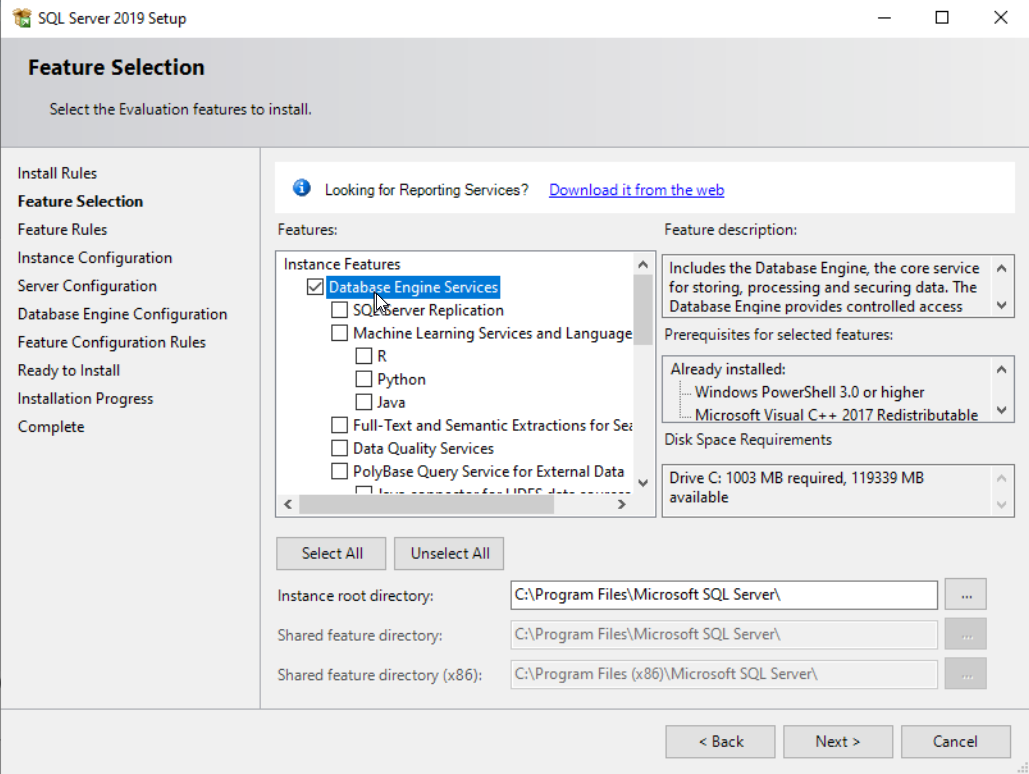
Do NOT select Express. SQL Express is not compatible with the MECM environment we are building. During the SQL Server Setup process, in “Feature Selection”, under Instance Features, select the Database Engine Services checkbox.
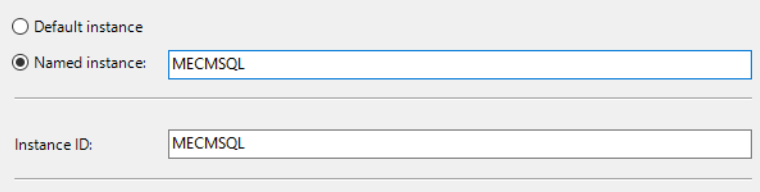
Within the “Instance Configuration” section of the setup, I created a named instances called “MECMSQL”, the instance name is up to you.
You will need to create a domain joined service account specifically for the SQL Server. I created an account called MECM-SQL and input this user as the SQL Server Agent and SQL Server Database Engine. You can create two separate accounts for these services if your security structure requires it.
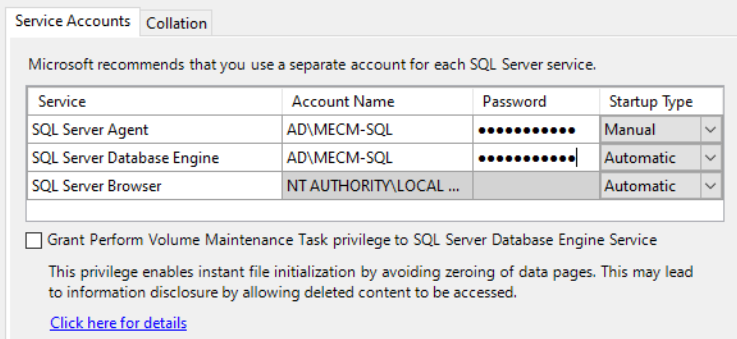
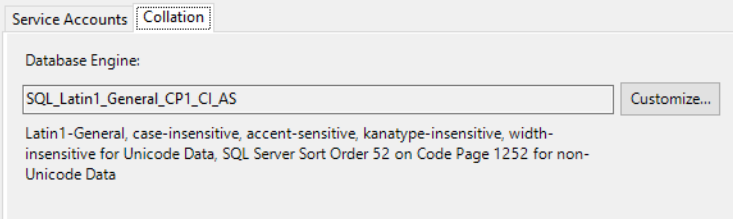
On the next tab “Collation”, you NEED to confirm you have “SQL_Latin1_General_CP1_CI_AS ” as the selected Database Engine. This is required for Configuration Manager and SQL Server to install properly.
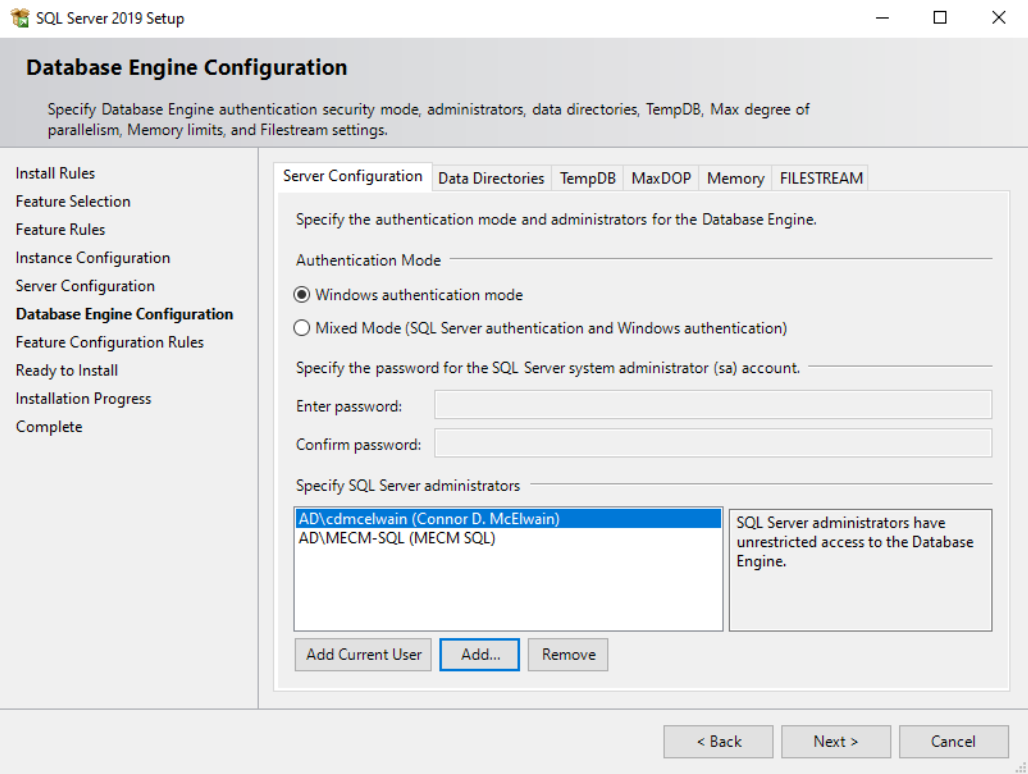
It’s recommended to create an MECM Admin group (and or an SQL Admin group) to specify and add who should receive admin privileges. In the “Database Engine Configuration” section of the setup installer, under the Server Configuration tab, specify the groups and or individual users who should become SQL Server administrators.
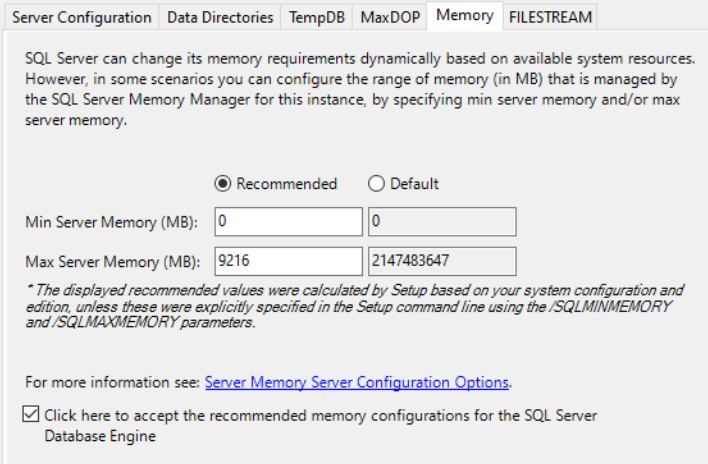
Next, under the memory tab within “Database Engine Configuration”, select the recommended memory settings.
You can now exit the SQL Server Installation Center program.
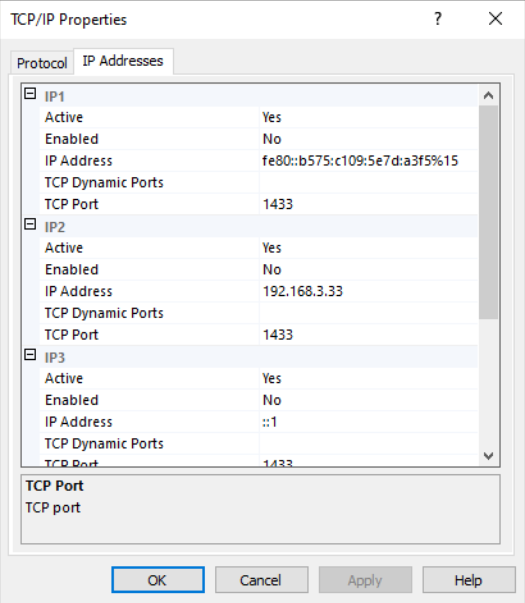
After installing the SQL Server, you will need to install the ODBC Driver for SQL Server and SQL Server Management Studio (SSMS) before you can start the Configuration Manager installation. Launch SQL Server Configuration Manager and navigate to “SQL Server Network Configuration”. Inside, select “Protocols for [Your Instance Name]", right click “TCP/IP” and select properties.
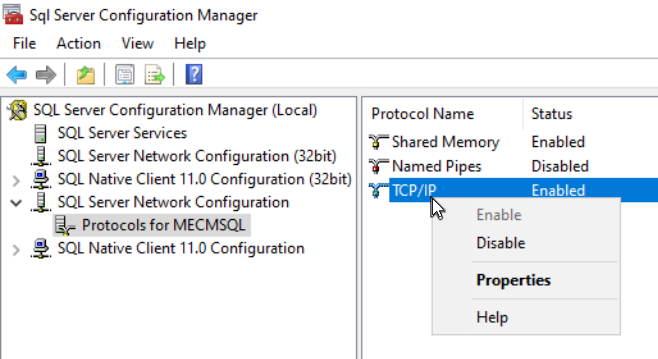
Remove any values within “TCP Dynamic Ports” under the IP Addresses tab and add port 1433 within TCP Port for IP1, IP2, IP3, IP4, and IPAll. In IP1, make sure Enabled is selected as Yes.
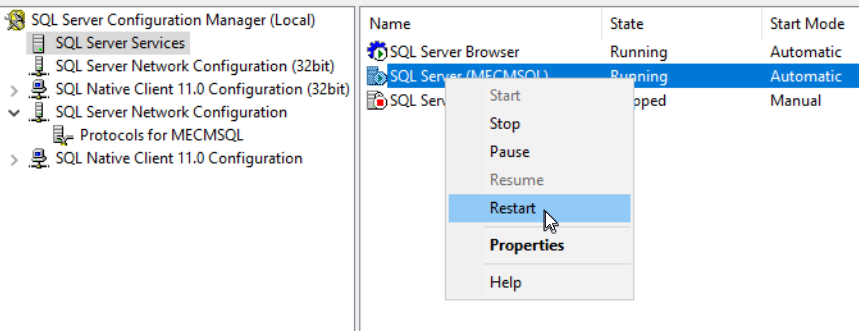
Go back to SSMS and restart the SQL Server within SQL Server Services to apply these new settings.
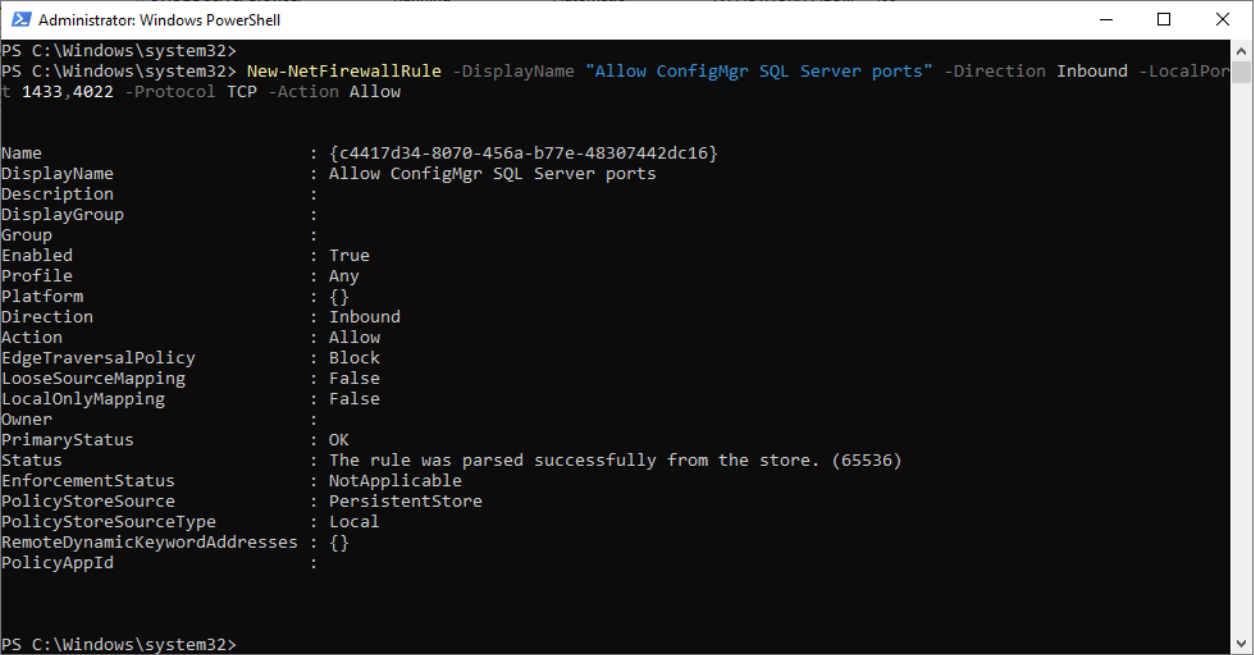
On the Primary Server, run PowerShell as administrator and input this command New-NetFirewallRule -DisplayName "Allow ConfigMgr SQL Server ports" -Direction Inbound -LocalPort 1433,4022 -Protocol TCP -Action Allow. This command opens the necessary ports within the firewall for the SQL Server.
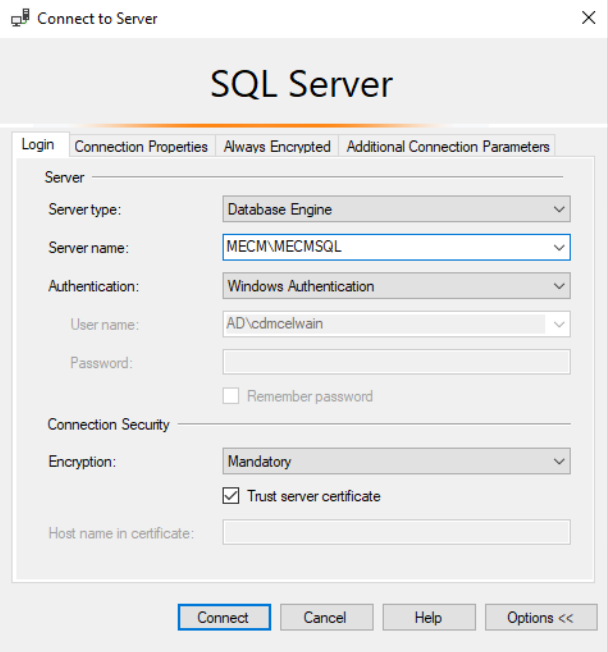
Now launch SSMS so we can connect to the SQL Server. In the “Server name:” section, input the name of the Primary Server hosting the SQL Server (in my case that server is called MECM), add a “\”, then the named instance you created (in my case it’s MECMSQL). It should look like this MECM\MECMSQL. If you’re having trouble connecting to the SQL server, under Connection Security, make sure you check Trust server certificate.
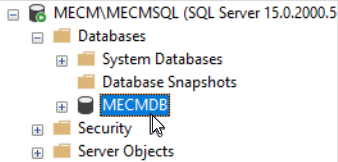
Once connected, right click the Databases folder and select New Database. For simplicity sake, name the database MECMDB, remembering the name of this database will be important during the Configuration Manager install process.
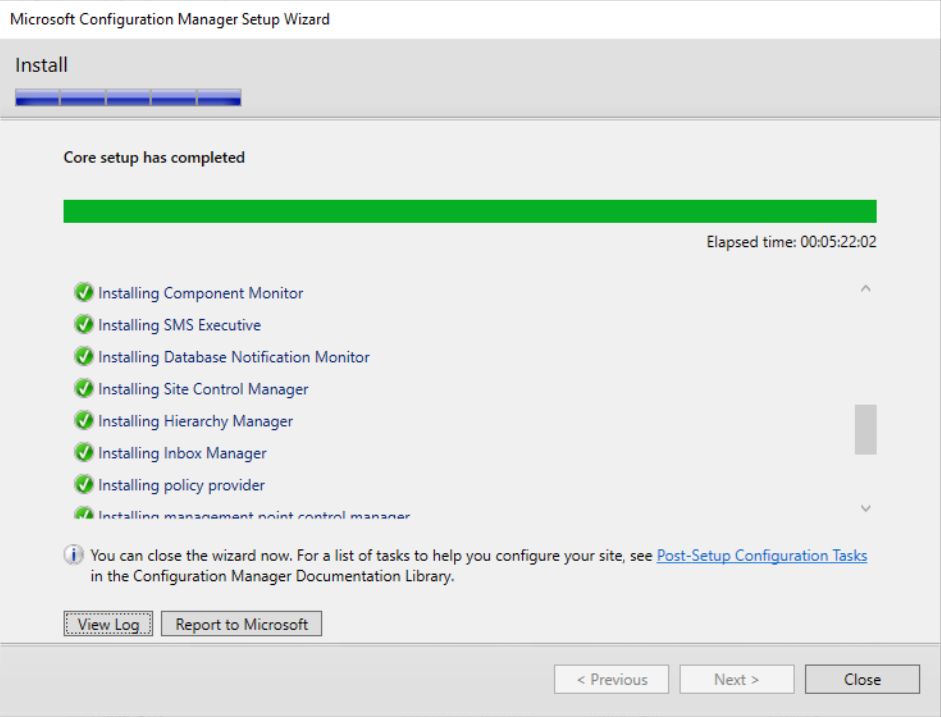
Configuration Manager Install Process
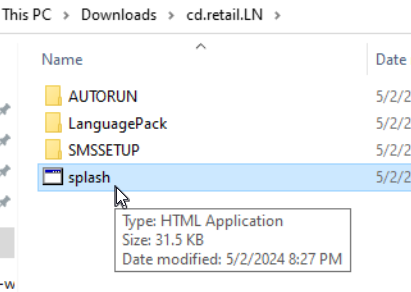
Download the Configuration Manager installer on the Primary Server and extract it. Open the installer by launching splash.hta.
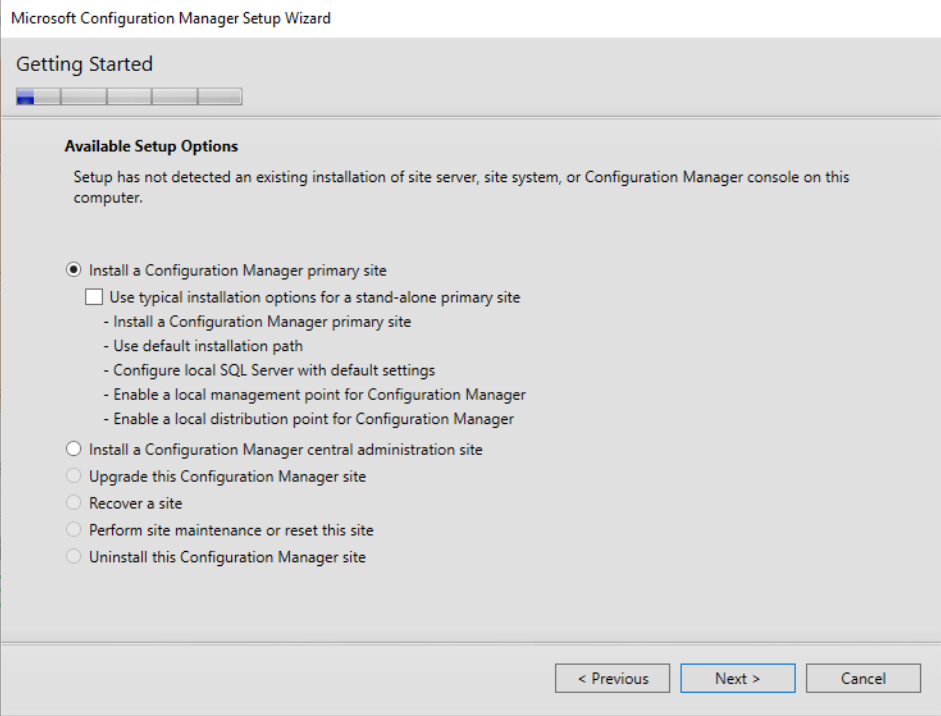
Within the Configuration Manager Setup Wizard under Getting Started, we will be selecting the default Setup Option Install a Configuration Manager primary site.
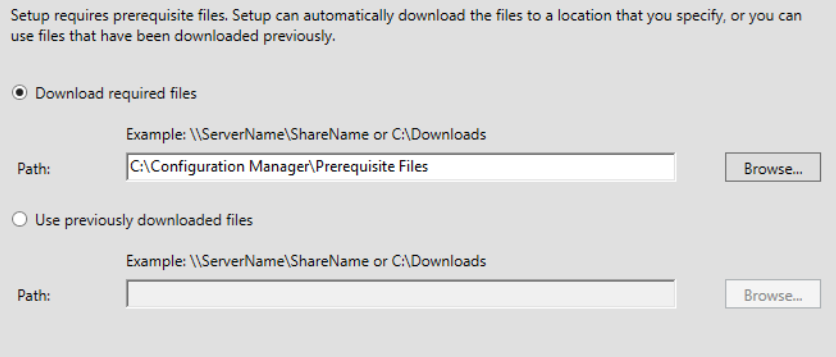
Create a folder D:\Configuration Manager\Prerequisite Files to store Configuration Manager’s prerequisite downloads and select said location to start its downloads.
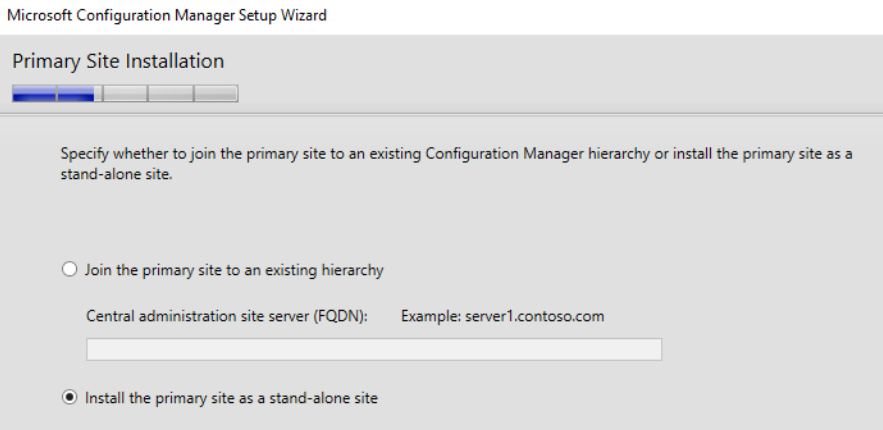
Under Primary Site Installation, select the Install the primary site as a stand-alone site option.
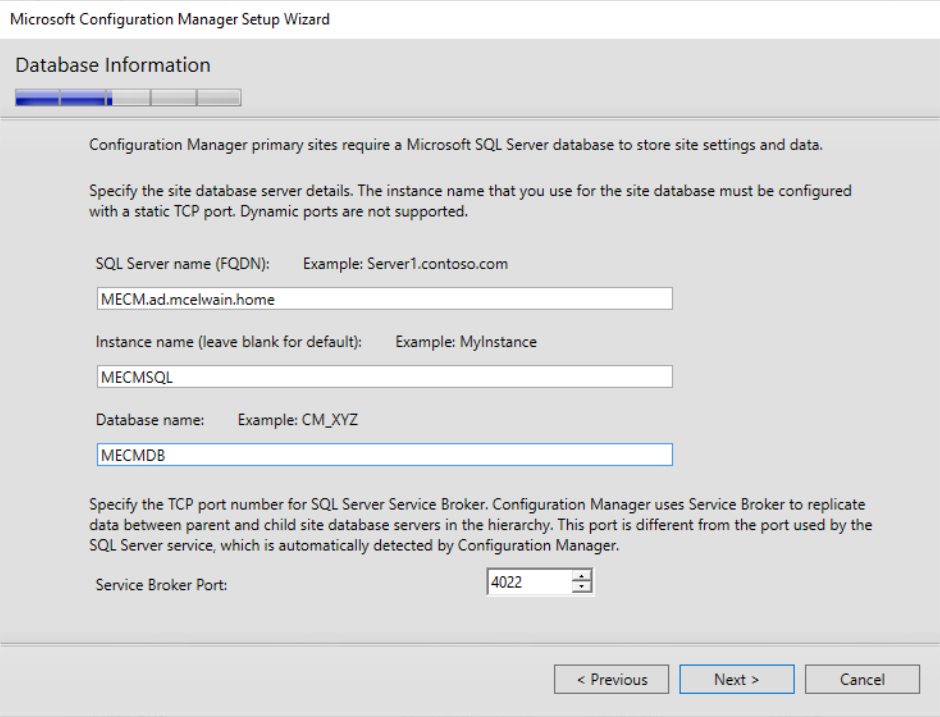
Under the Database Information portion of the install process, provide the custom SQL instance name (if you created one) and the name of the database we previously created. For me the SQL instance name would be MECMSQL and the database name would be MECMDB.
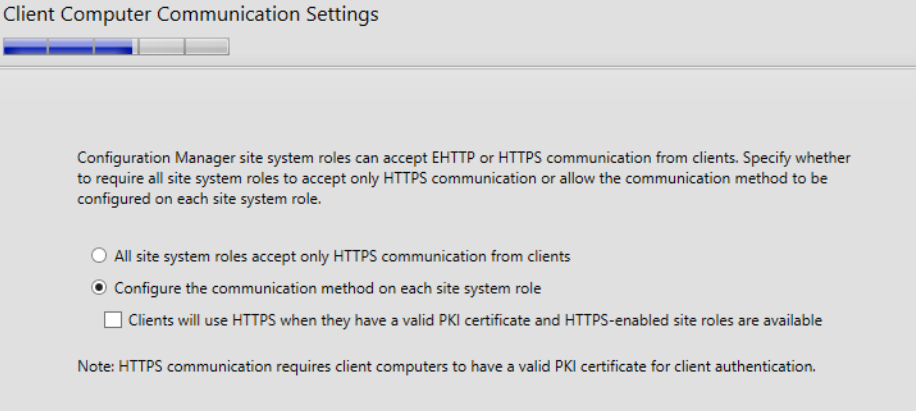
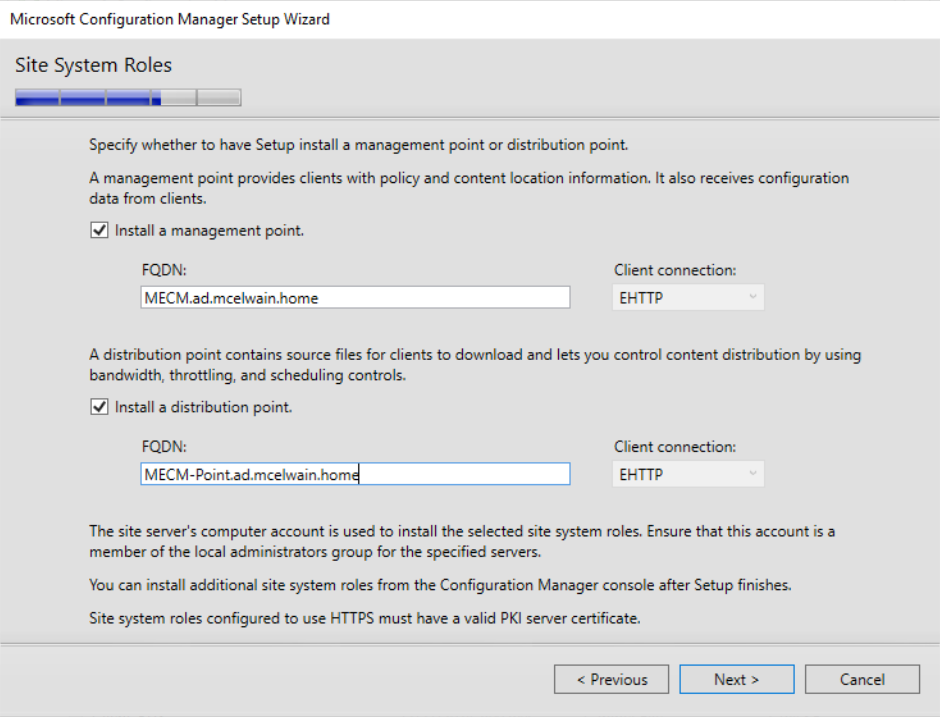
Under Client Computer Communication Settings section, select the second option Configure the communication method on each site system role.
On the Site System Roles install section, direct the distribution point install to the Distribution Server and the management point install to the Primary Server.
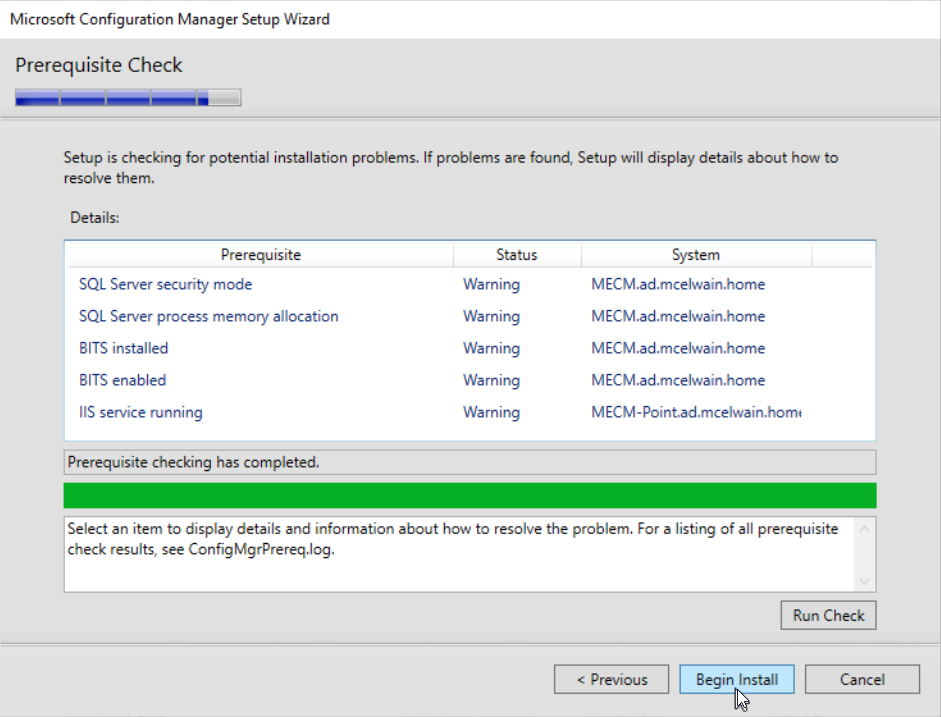
Once the Prerequisite Check has completed with zero errors, proceed with the Configuration Manager install.
Updating Configuration Manager
First thing we want to do is ensure Configuration Manager has the latest updates installed. Launch the Configuration Manager Console from the Primary Server.
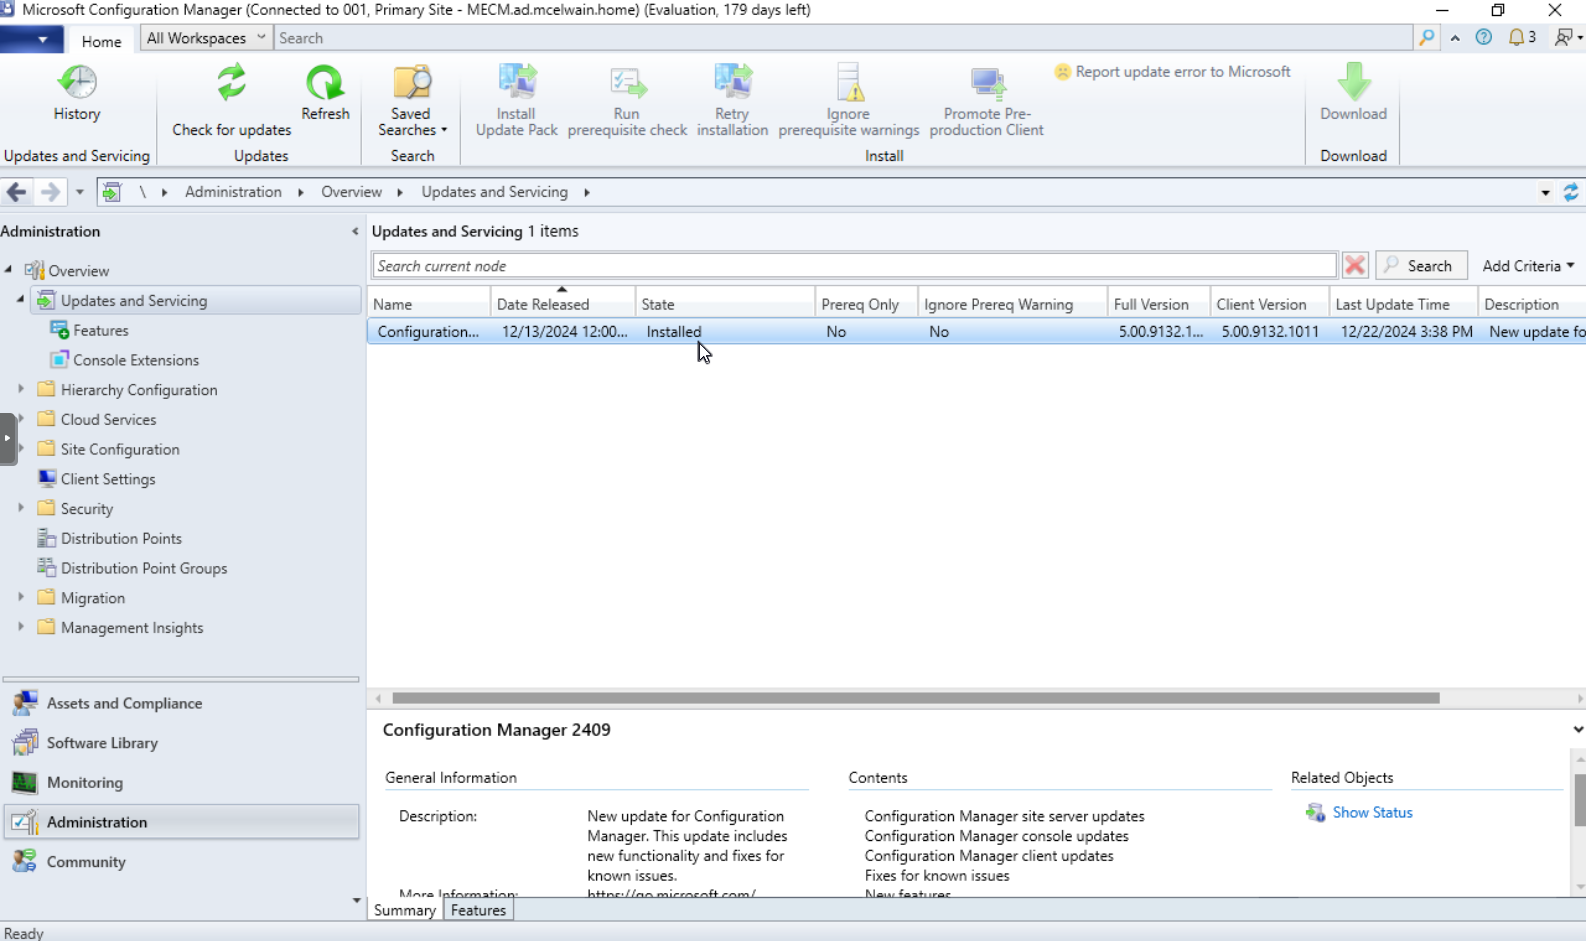
Navigate to the Administration section at the bottom left of Configuration Manager. Within Overview, go into Updates and Servicing. Click the “Check for updates” button, if there are updates available for installation, click on the update, make sure the “State” for the update says Read to install. If it’s, click the Install Update Pack to proceed.
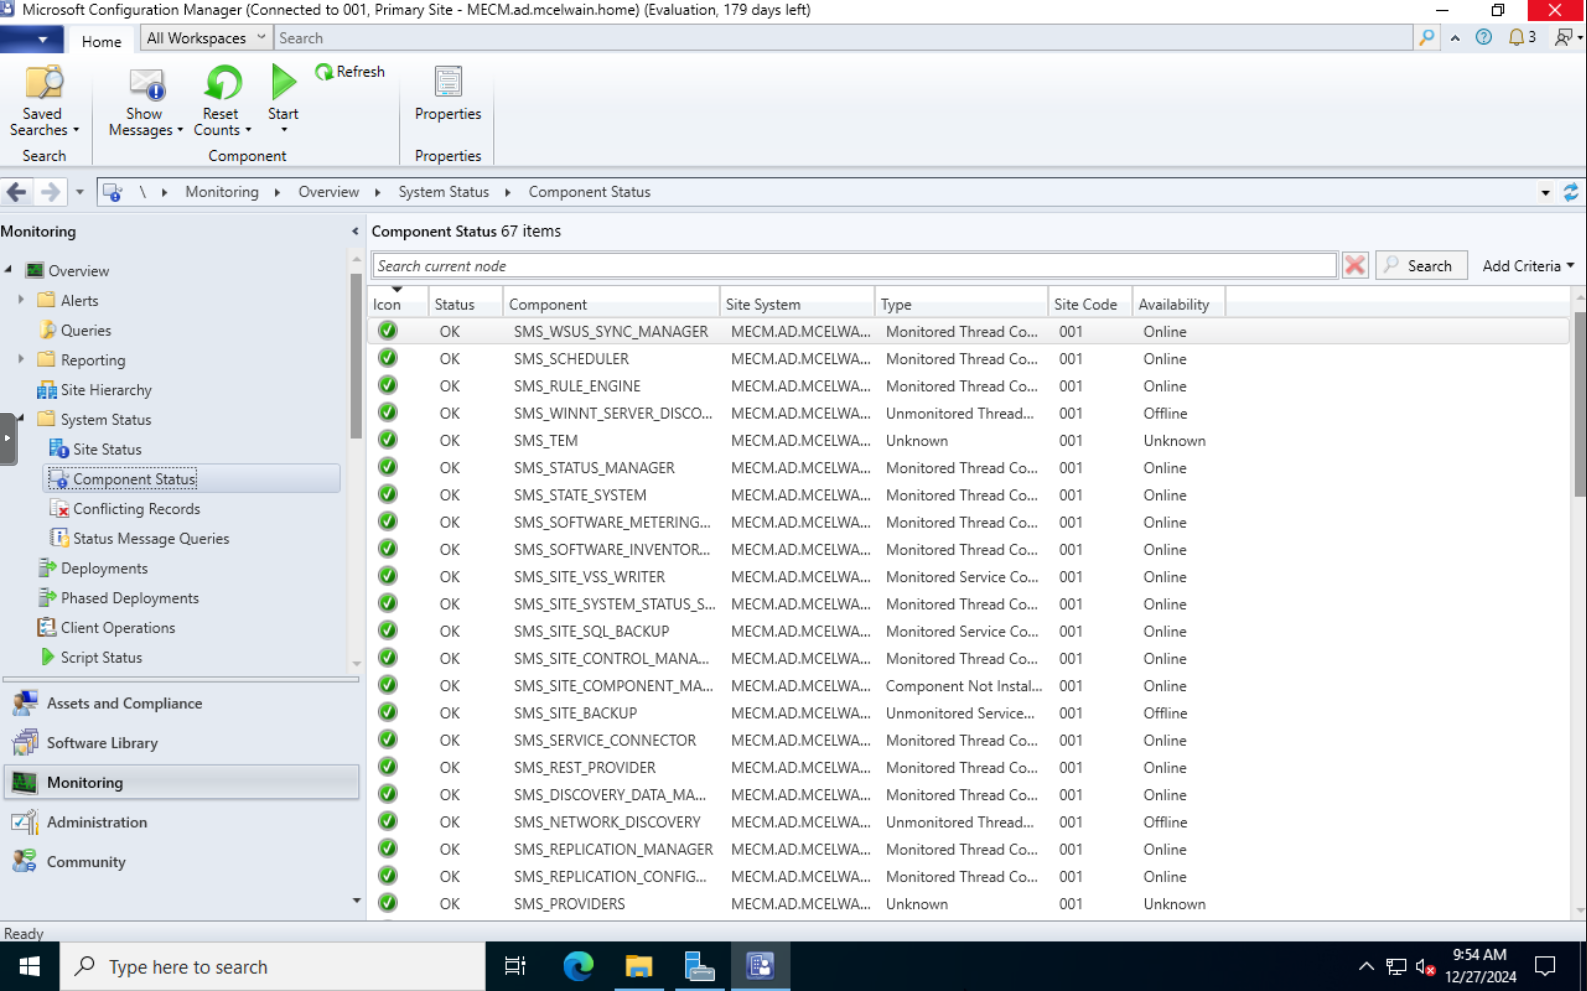
Launch Configuration Manager, select Monitoring at the bottom left of the program, within System Status, ensure the monitoring sensors on Site Status and Component Status are green/“OK”.
Discovering Devices
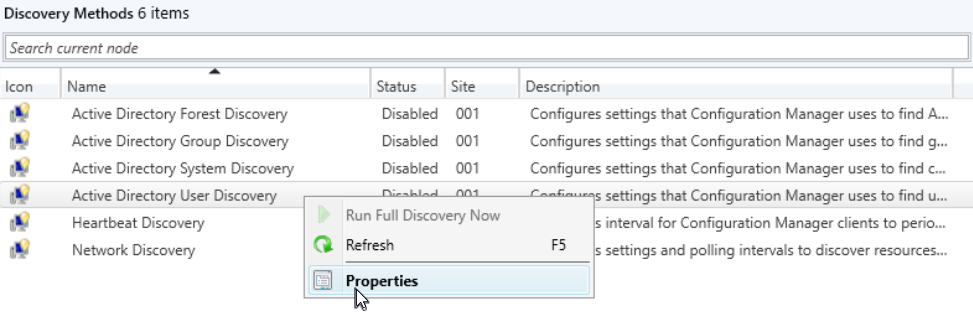
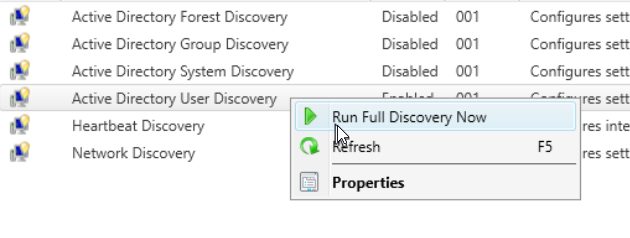
Next is to find all of the devices on your domain. Navigate to Administration, Hierarchy Configuration, then Discovery Methods . Here we will determine which discovery method we want to enable to find our domain joined systems. In this instance, I will use the Active Directory System Discovery method. This will discover all devices that have been domain joined. Right click the discovery method and select properties.
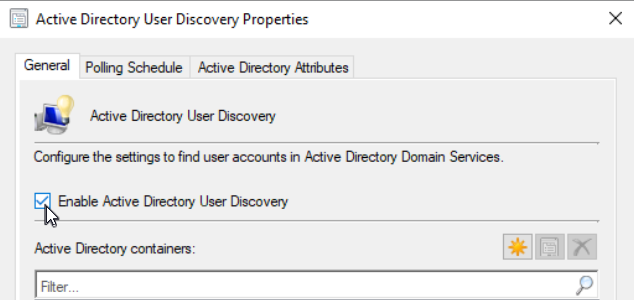
Check the Enable Active Directory User Discovery box, click apply, then right click the white area towards the lower half of the window and select new.
The path you select will be dependent on how you have AD set up, in my case because I want to find all devices connected to the domain, I selected the top level container.

Click OK to exit out of the window to go back to the Discovery Methods page within the Administration tab of MECM. Right click the Discovery Method you just edited (in this case Active Directory System Discovery) and select the Run Full Discovery Now option.
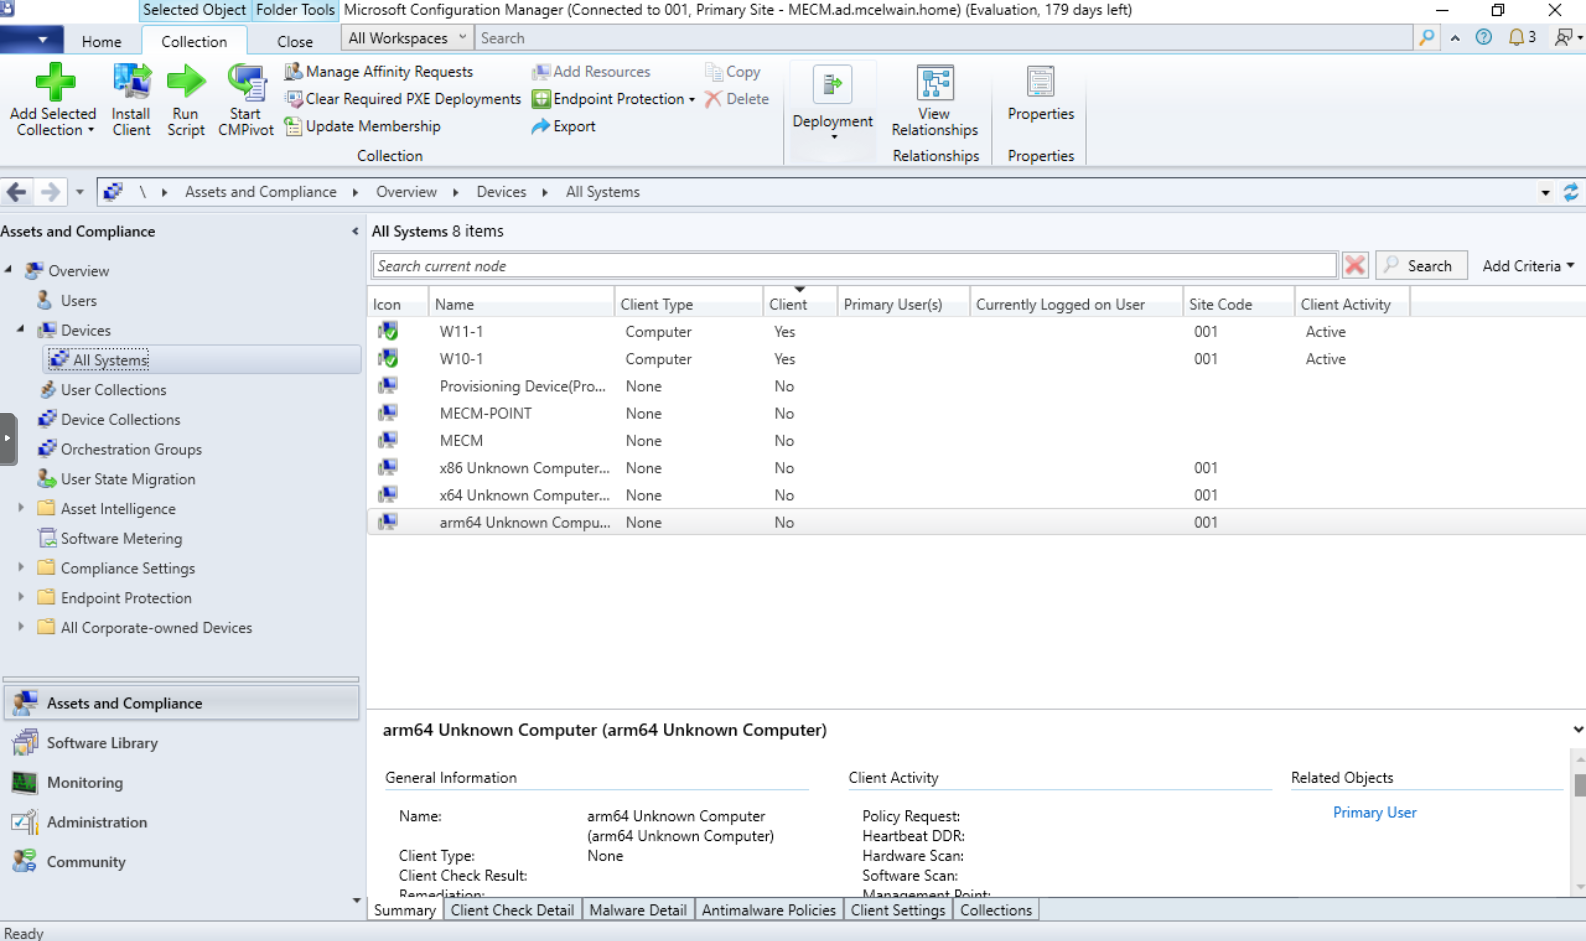
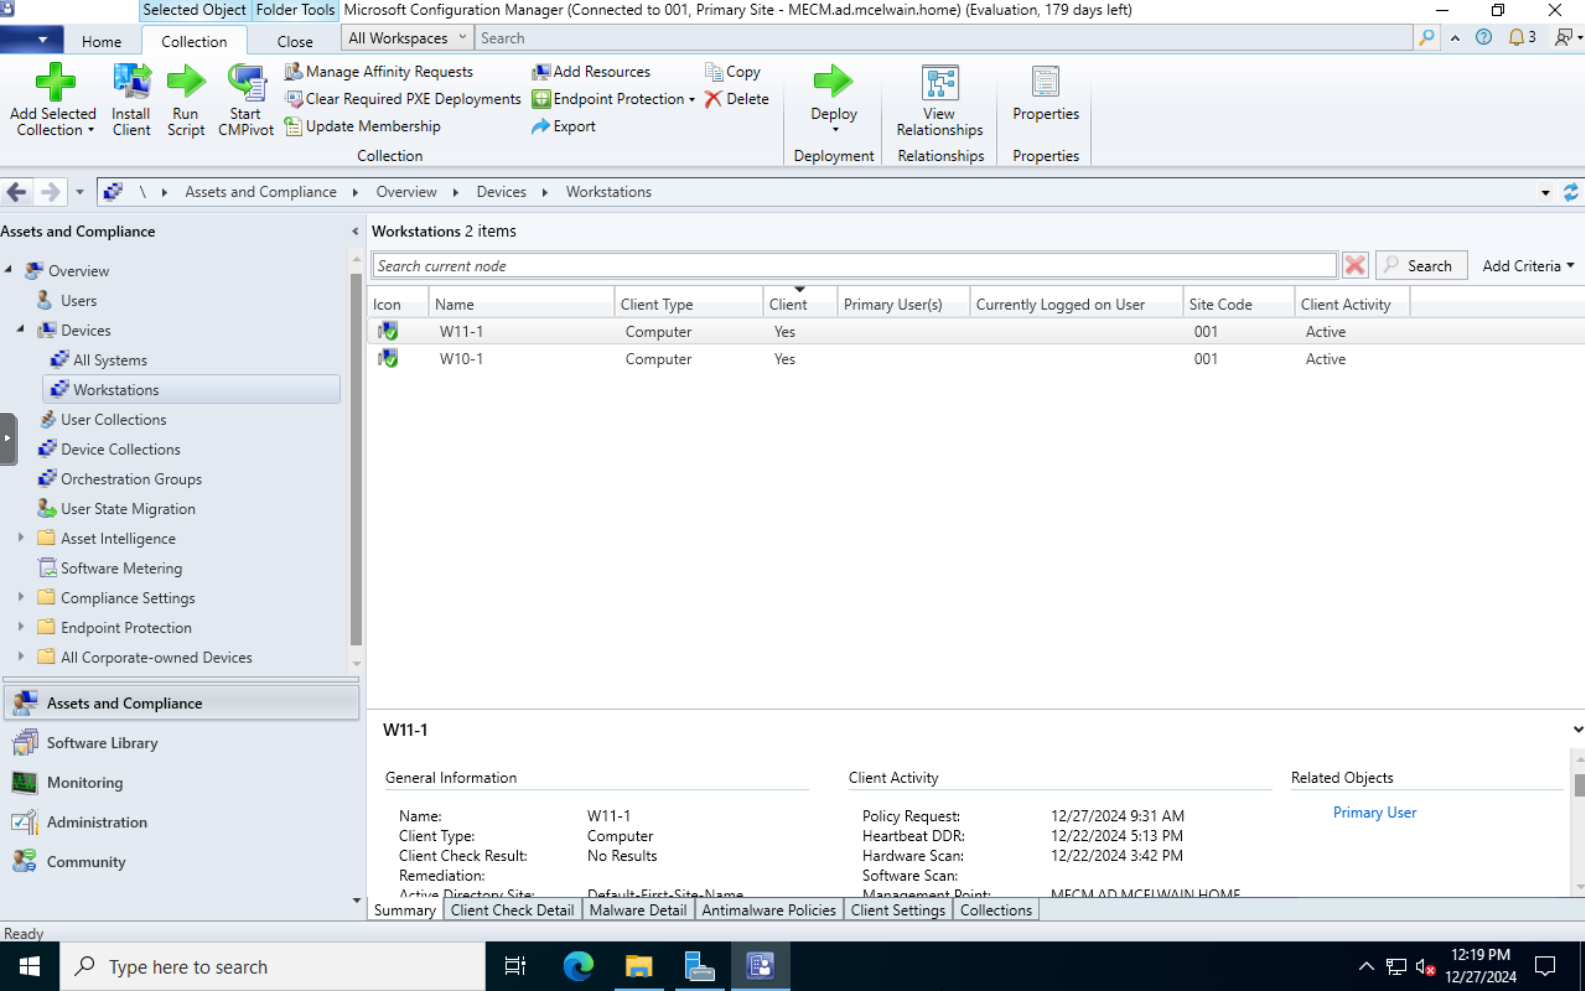
It may take some time to complete the discovery process. Confirm all your systems have been populated by navigating to Assets and Compliance, Device Collections, and then All Systems.
Creating Device Collections
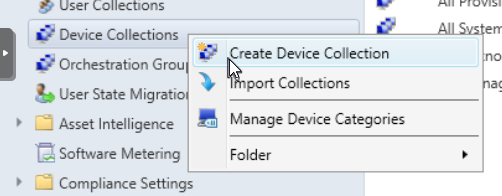
Once you have confirmed all devices have been populated within Assets and Compliance, we can start installing the client on systems. Within Assets and Compliance, right click Device Collections and select Create Device Collections .
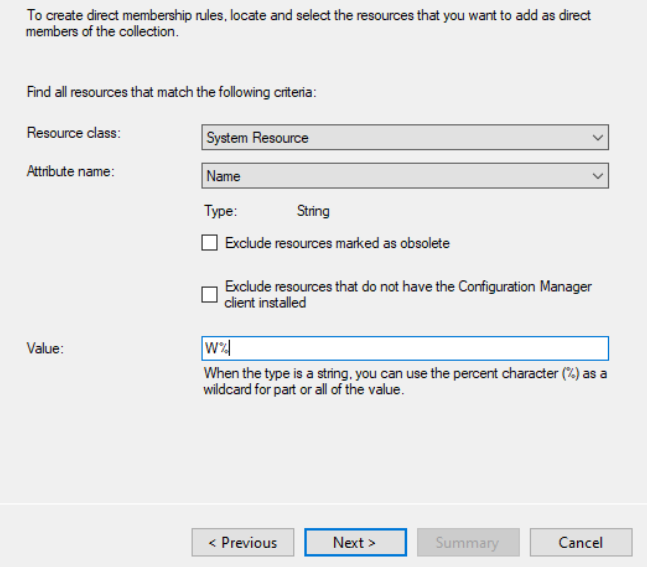
For this example, I will name this device collection “Workstations”. This collection will only have desktop computers and will ignore any servers also in AD. Click the “Browse..” button next to Limiting collection and select All Systems. We need to add a rule , in this case a Direct Rule. Select System Resource for Resource class and Name for Attribute name. In this example the name of my workstations start with “W” (W10/W11), so to detect only systems with that naming scheme, putting “W%” in the Value portion of this page will allow the query to only search for systems that start with W.
Since my servers do not follow this naming scheme, they will not show up in this Device Collection. Once you have finished the device query and selected your systems to be added to the Device Collection, check the “Use incremental updates for this collection”. This will periodically check for new resources on the domain that fit this “W” naming scheme and add them to the collection. This is not required, but it’s a nice feature to have enabled. After completing the rest of the set up process, go into your newly created Device Collection to ensure you see all the devices have imported properly.
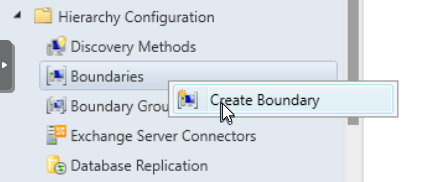
Boundaries and Boundary Groups
Once you have created your Device Collections and have organized where you want your systems to be, we need to configure Boundaries in the Administration section. Within Administration, under Hierarchy Configuration, right click Boundaries and create a new Boundary.
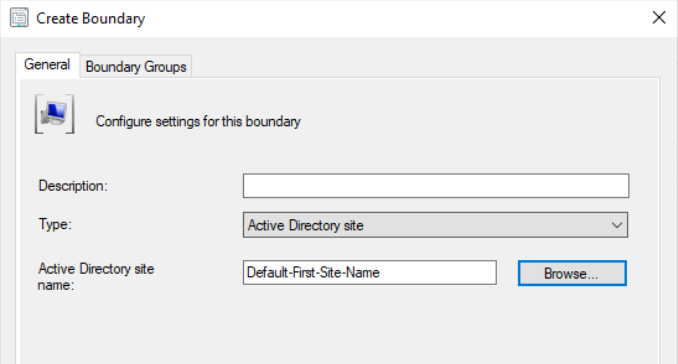
Depending on your goals will determine how you want to configure your boundary. For this example, I will stick with creating an Active Directory site boundary
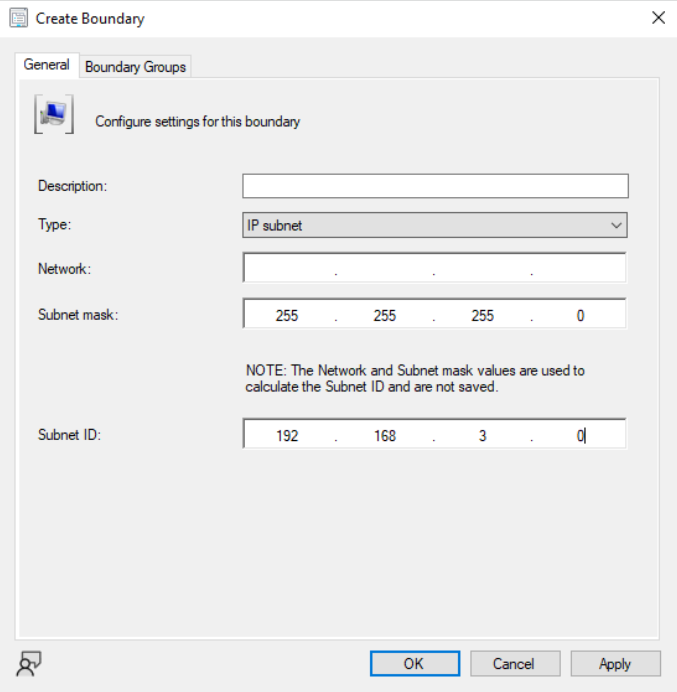
and an IP subnet boundary .
Right click the IP subnet boundary we just created, hover over “Add Selected Items” and select Add Selected Items to New Boundary Groups.
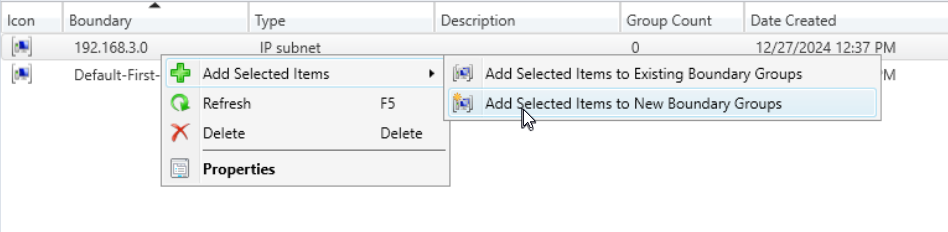
This menu will allow you to create a Boundary Group and add your boundaries to it.
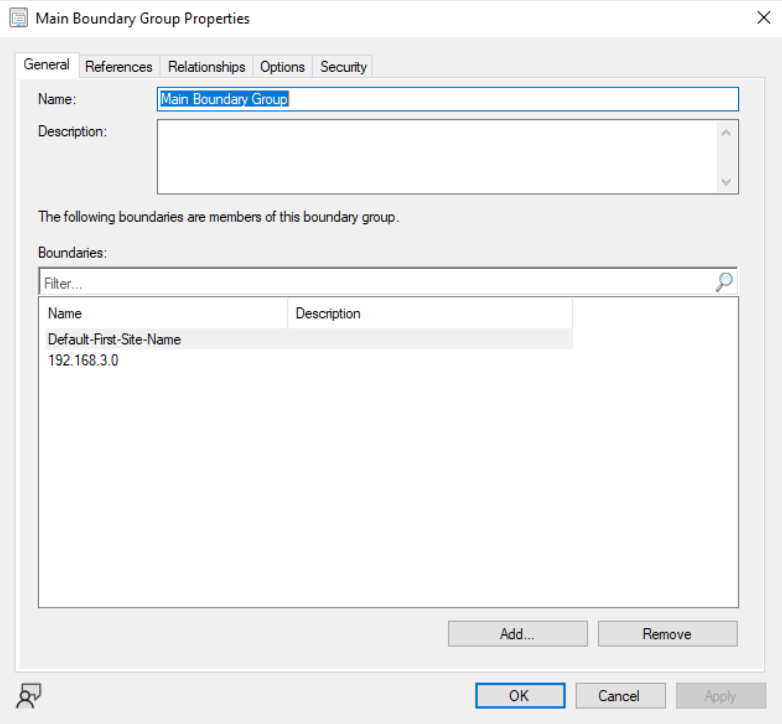
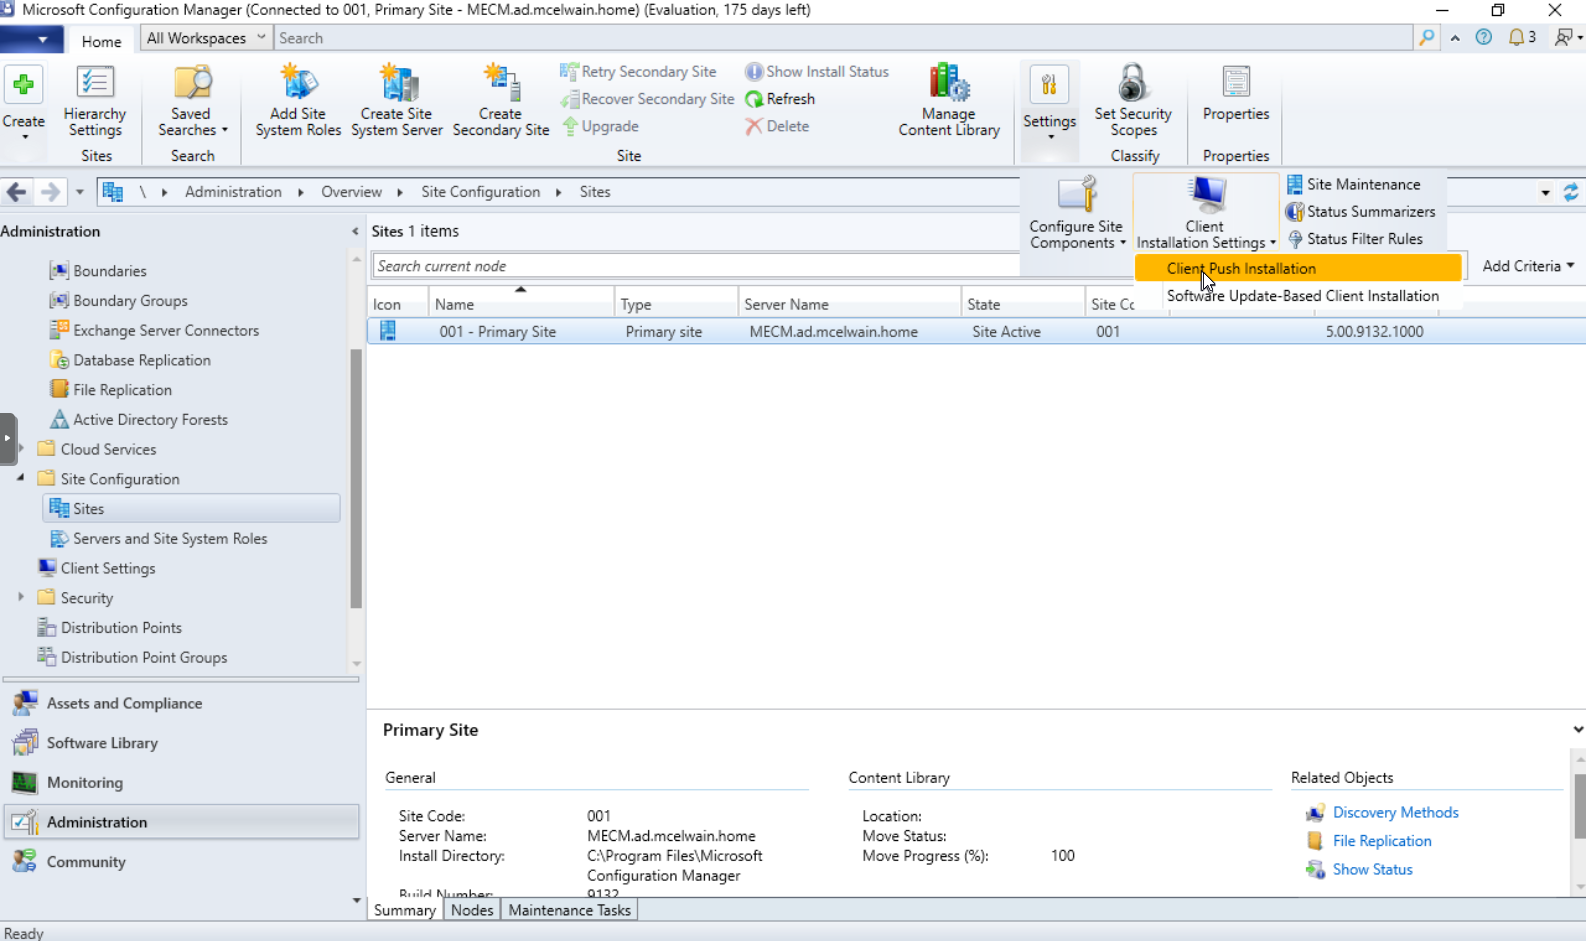
Now go back to the Boundary Groups tab, right click your custom created boundary group, and go to properties. Click the References tab and add your site system servers (Primary Site Server and Distribution Server). Next we will need to set up and assign the installation account that will be used to push the MECM client, updates, and software to systems. Navigate to Site Configuration, Sites, left click your Primary site, click the Settings drop down towards the top right side of the window, click the Client Installation Settings drop down, and select Client Push Installation.
On the General tab, check the Allow connection fallback to NTLM option IF security protocols within your environment are okay with the potential security risks that come with NTLM authentication.
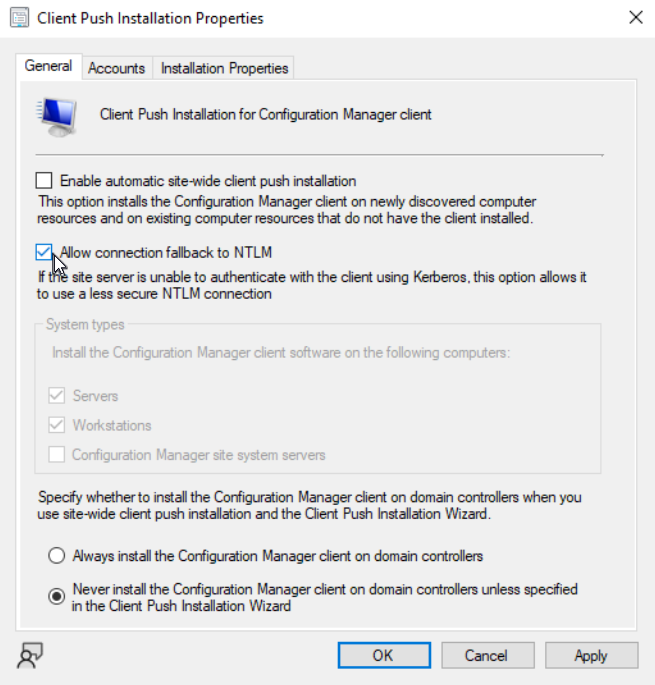
This will allow MECM to authenticate with a less secure connection as a fallback option if Kerberos is unable to authenticate. Now go into the Accounts tab within this new popup window and select the service account we created earlier specifically for MECM installs (MECM-Installs). Ensure this account is in the proper administrative groups in AD or else you will run into permission issues when attempting to push the client installs to computers. Make sure ports TCP: 135, 445, and 2701 are open on all client systems.
Pushing Client Installs
The next step after completing these prerequisites is to install the client on our computers. Navigate back to your Device Collections in Assets and Compliance, right click the device collection of your choice and select Install Client.
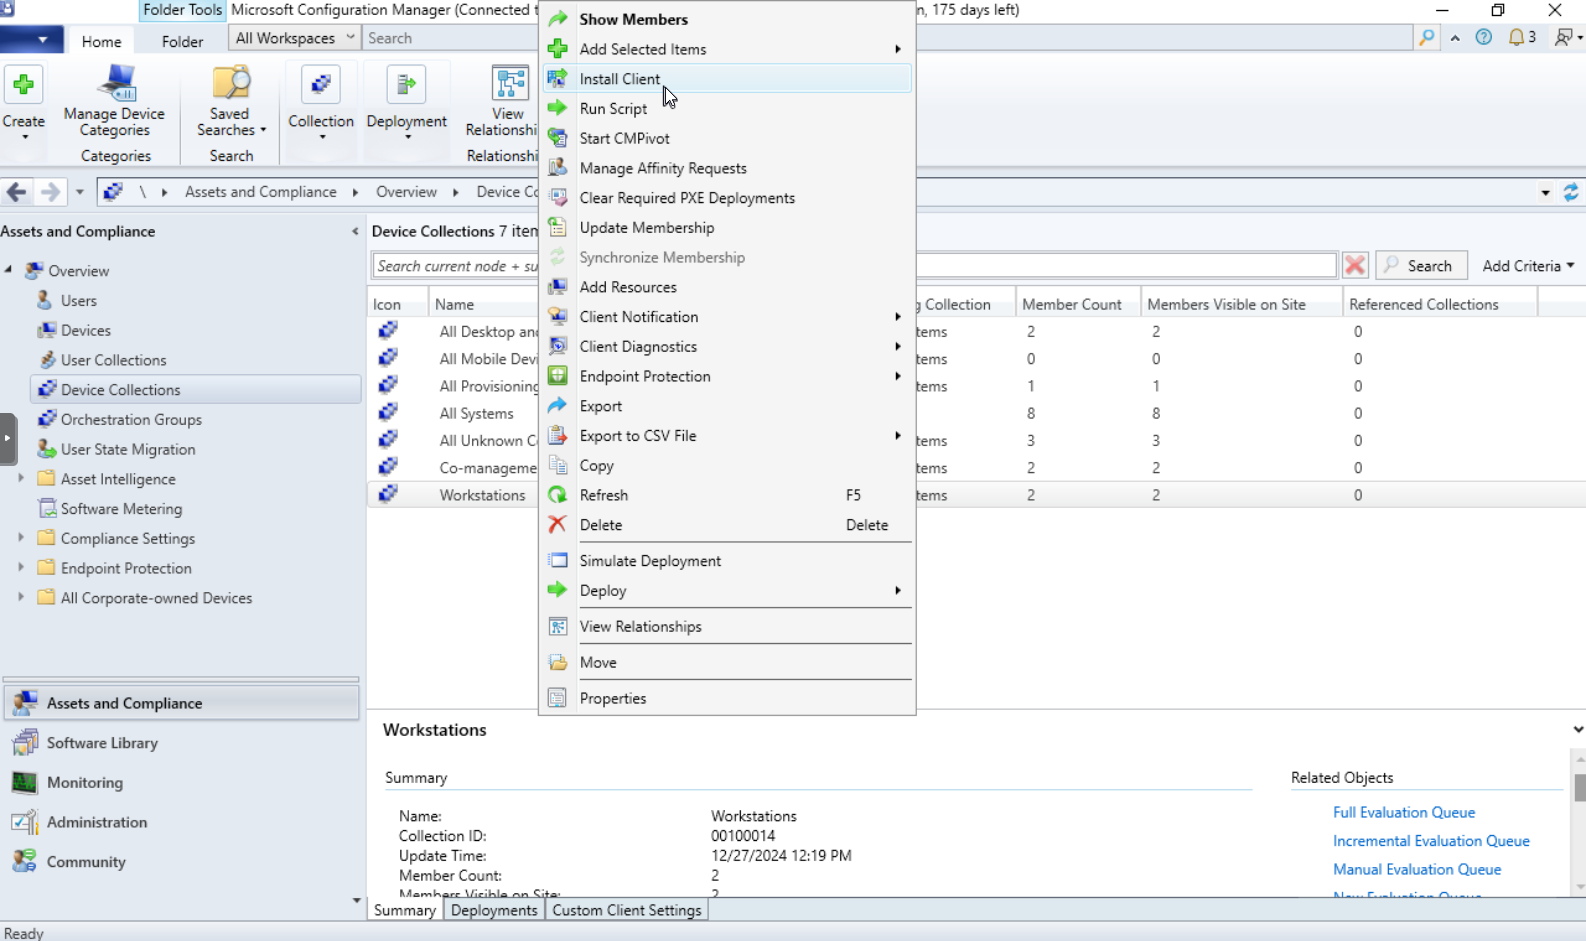
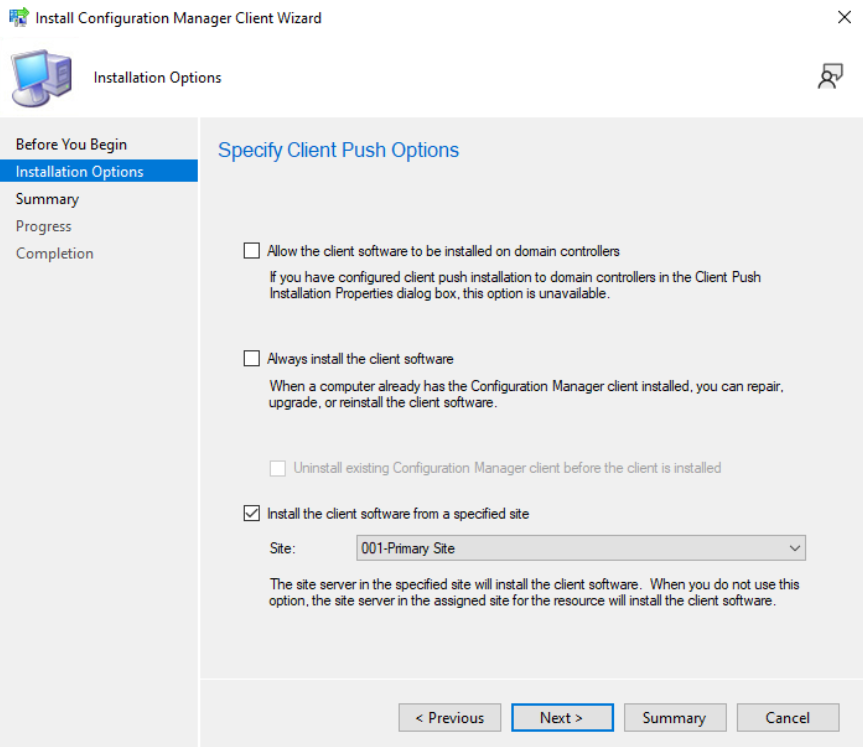
Ensure you check the “Install the client software from a specified site” and select your Primary Site.
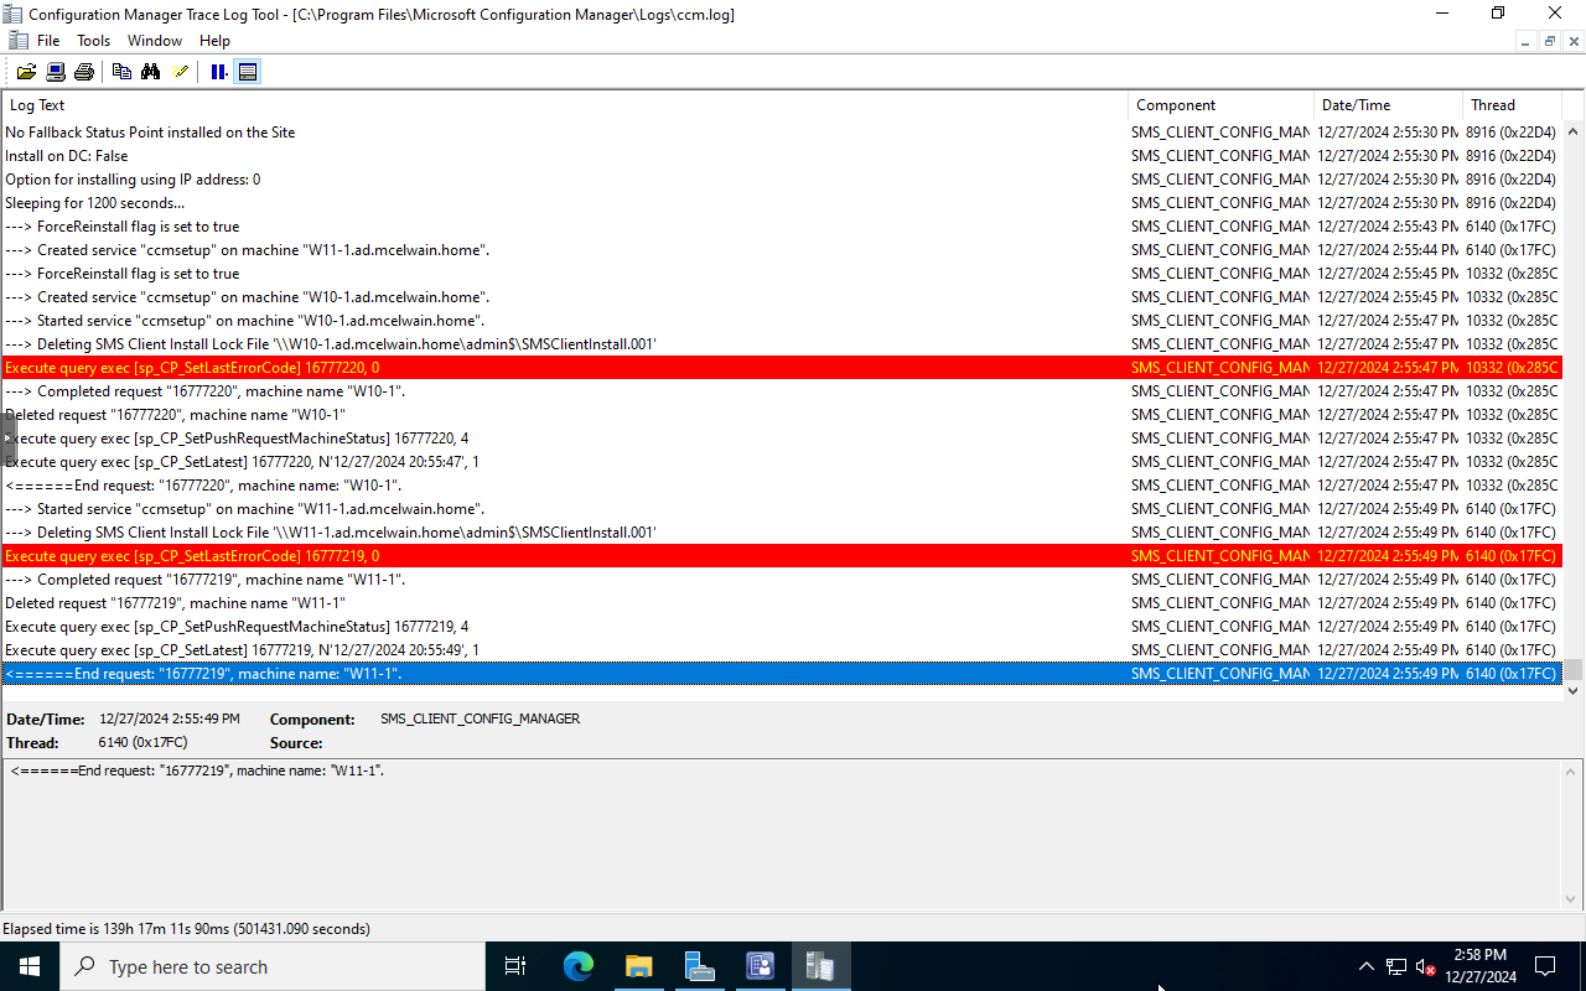
Refer to the ccm.log \Program Files\Microsoft Configuration Manager\Logs\ccm.log to view any errors for client deployments. You can use the CMTrace log viewing tool that can be found within Configuration Manager’s installation files \SMSSETUP\TOOLS\CMTrace.
When a client has been successfully installed on a system, it should reflect that change with Client = Yes in the Device Collection. You MUST approve any trusted device that has the client installed to complete the installation process.
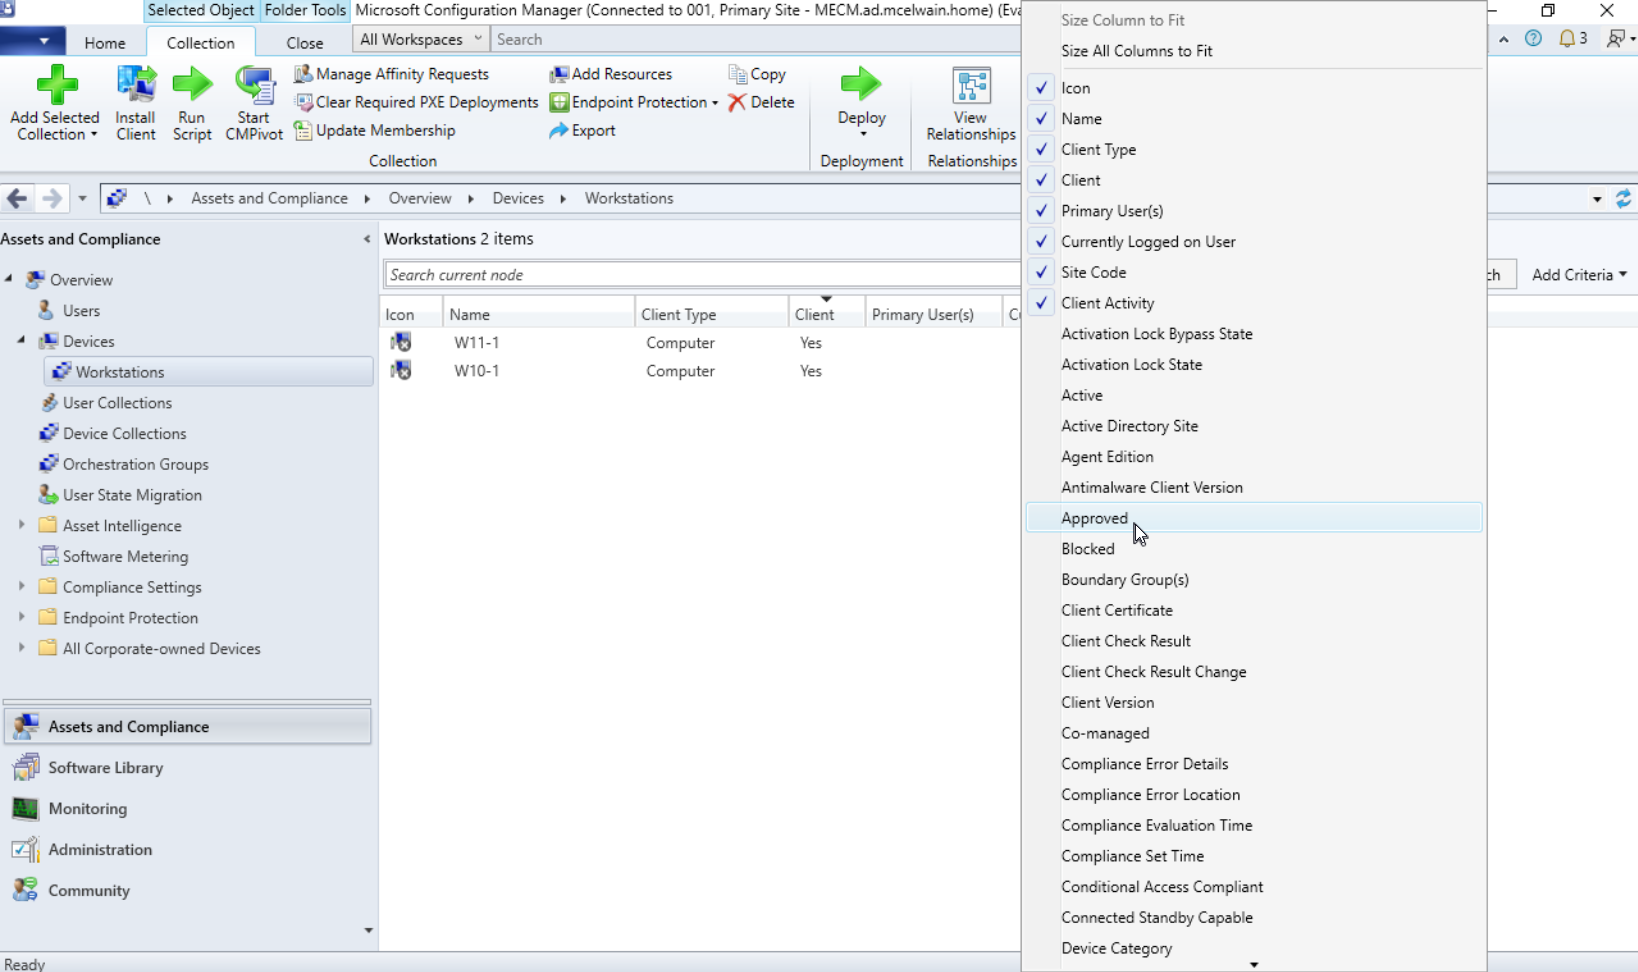
This can be automated, but by default you must manually approve client device installations on trusted systems. In order to manually approve trusted workstations for the client to be installed, within your Device Collection right click an empty spot in the tab section and select Approved.
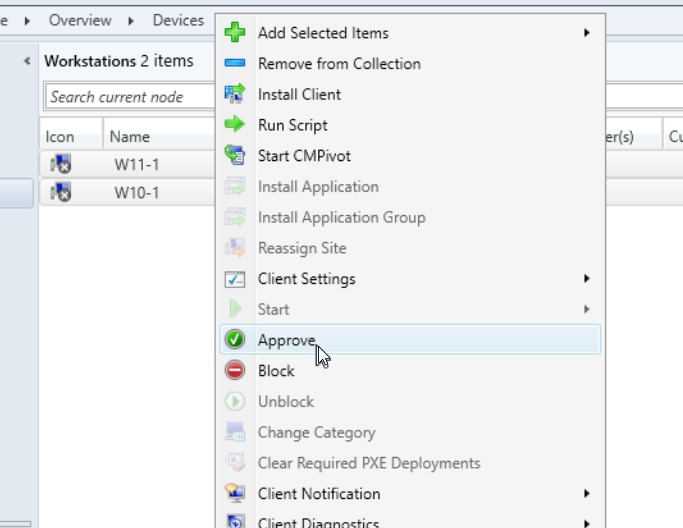
This will now show you which devices are approved or have not been approved yet. Right click the devices you want to approve, and select approve.
Automatic Client Approval
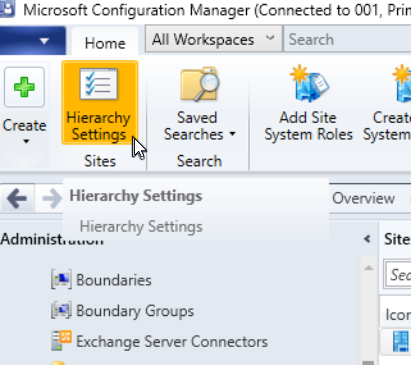
Configuration Manager will automatically approve clients that have been added to the domain and have a valid PKI certificate allowing them to authenticate through Kerberos authentication . If you do not have this set up, devices will authenticate via NTLM. Due to NTLM being considered less secure, Configuration Manager will not auto approve devices joined in the domain. To enable automatic approval without devices having PKI certificates/authenticating through Kerberos, navigate to the Administration tab in Configuration Manager. Under Site Configuration, left click Sites and click the Hierarchy Settings button towards the top left of the window.
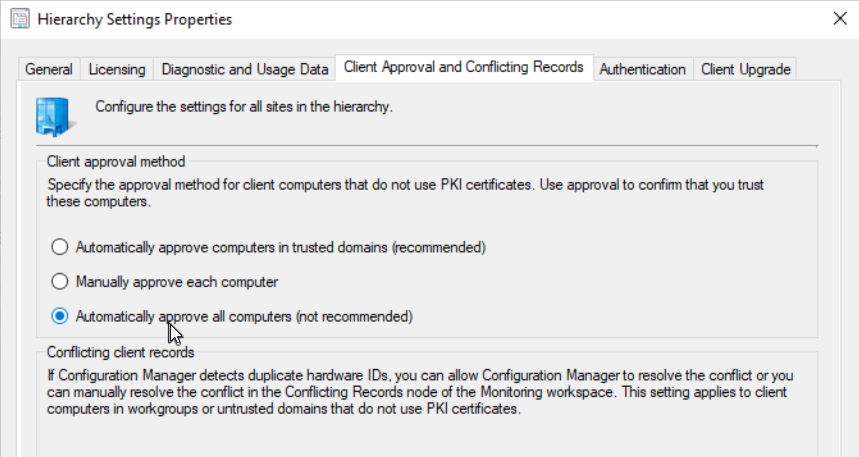
Click the Client Approval and Conflicting Records tab, under Client approval method, select the “Automatically approve all computers (not recommended)” option, click apply.
Creating an Application for Deployment
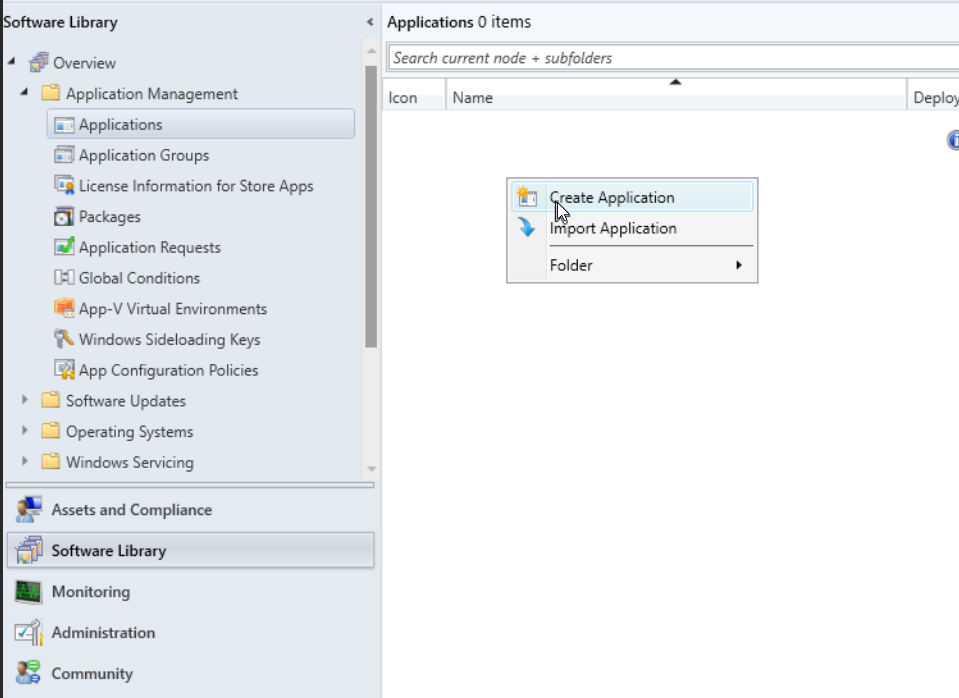
To create an application like Google Chrome to deploy to systems, navigate to Software Library at the bottom left of Configuration Manager. Within Application Management go to Applications. Right click Applications, select Create Application. Select the type of application installer and the location where the installer is.
Deploying an Application
To deploy an application to systems with the client installed, navigate to the Device Collections and right click the collection you’d like to push the software to, hover over Deploy, and select Application.
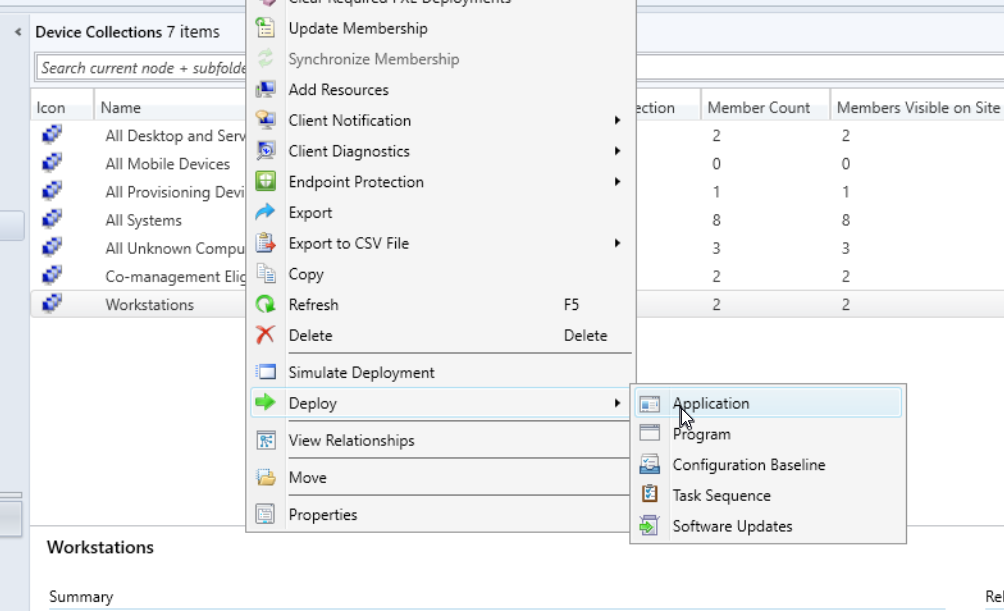
From the “Deploy Software Wizard”, you can select which application you’d like to deploy. In Deployment Settings within the wizard, you can either force installs on devices by selecting “Required” within the Purpose section, or “Available” if you want to add the application install as an option within those system’s Software Center. To speed up the process, if you right click the Device Collection you just deployed an application to and hover over Client Notification, select Download Computer Policy.
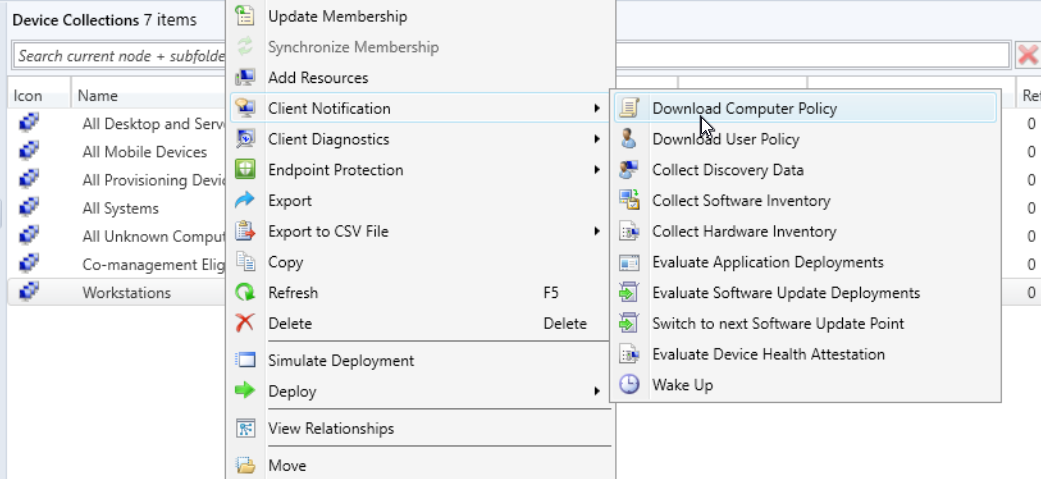
This will force sync the systems in that collection with the most recent information from Configuration Manager. This is a quick and easy way to push any updates you make to device’s Software Center (and other changes).
Updating an Application
Pushing an update on an application or package is common to ensure all software is securely patched on your managed systems. Whether you’re updating an install script or just replacing an installer in Software Library, make sure after your changes that you left click the application, and select the Deployment Type tab towards the bottom of the window. Right click the installer within that tab and select Update Content.
Setting up MECM for OS Deployments/Imaging
Windows Deployment Services Install
- Install Windows Deployment Services (WDS) on your primary server.
- Server Manager
- Add roles and features
- Role-based or feature-based installation
- Add roles and features
- Server Manager
Enabling PXE Boot
In MECM, navigate to the Administration tab, Site Configuration, Servers and Site System Roles, select the server with the Distribution Point (DP) role, right click the Distribution Point role and select properties, select the PXE tab and check the “Enable PXE support for clients” box. While this is optional, it’s recommended to enable and add a required password for when computers use PXE. Restart the Windows Deployment Services service (services.msc).
Creating an OS Image
Download a clean Windows ISO (10 /11 ). Create a folder on your storage drive to store/organize your ISO’s. Mount the ISO and extract install.wim from sources\install.wim. Depending on the OS version and where you downloaded the ISO, you may find that some ISOs don’t have install.wim, but instead have install.esd. ESD files are heavily compressed versions of .wim. In our case, we need .wim files in order to properly create/deploy an OS image in MECM. To convert an .esd file to .wim, open an admin command prompt and run DISM /Get-WimInfo /WimFile:E:\sources\install.esd. This command returns a list of all the Windows editions in the ESD file. In my case, I want to create a WIM file for Windows 10 Pro, which is the index number 6. The next command may require modifications to work for your needs, DISM /Export-Image /SourceImageFile:E:\sources\install.esd /SourceIndex:6 /DestinationImageFile:C:\install.wim /Compress:Max /CheckIntegrity. This will take some time, but once completed, you should have an install.wim file in the destination folder you selected. Navigate to Software Library in MECM, Operating Systems, Operating System Images. Right click Operating System Images and select “Add Operating System Image”. Select the path with install.wim, name the OS Image, and finish the prompts within the wizard.